

Estimated reading time: 16 minutes
There are so many benefits of growing food in buckets. A primary benefit is that it’s inexpensive compared to the prices for terra cotta pots or the fancier glazed ceramics. Buckets can be found around the house and upcycled or even purchased for a lot less than the usual garden pots.
Five-gallon plastic buckets can be bought online, but a lot of home-centers sell them for much cheaper, assuming you don’t mind a Home Depot or Menard’s logo across the front. Then again, those same places sell spray paint for a couple bucks a can, allowing you to paint your buckets with a color that matches your patio, deck, or yard.
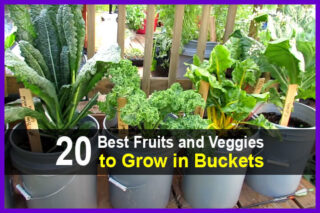
The big question is: What exactly can you grow in a bucket? The easy answer is just about anything you plant in the ground, assuming you take some extra time for watering and feeding.
There are a few things that don’t tolerate the confines of a bucket, such as sweet corn and pumpkins, but it’s easy to find varieties of just about any fruit or vegetable that can grow in a bucket.
Want to save this post for later? Click Here to Pin It On Pinterest!
Bucket Garden Benefits
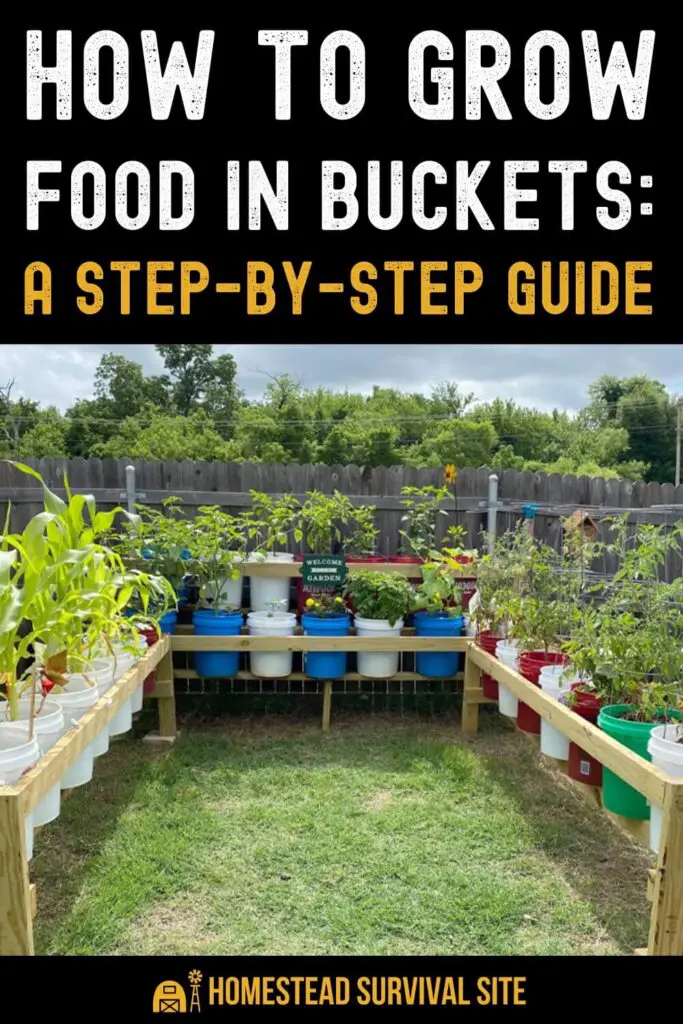
An obvious benefit of a bucket garden is that allows someone with little or no space in their yards to grow fruits and vegetables. How many you grow depends on the number of buckets you use, but high-yield practices like succession planting and companion planting can give you multiple crops in a season, even with only few buckets.
Aside from apartment dwellers without a yard for a garden, growing food in buckets lets even those with a conventional garden add to their crops with buckets on the deck, patio, front-porch, and even on the side of the house or garage where a garden wouldn't normally fit.
Growing food in buckets also gives you the flexibility to take your crops indoors or put them in the garage during bad weather. It can also you to grow annuals by simply moving your plants indoors in the fall and winter.
Finally, you can take your bucket garden with you, whether it’s an emergency or you’re simply moving to a new location.
Bucket Gardening Success Factors
Growing in a bucket can stress any type of plant if you don't take care of it. Here are the things to think about and keep an eye on:
Water
Unlike anything planted in the ground, fruits or vegetables in a bucket don’t have the benefit of surrounding ground water or a large volume of moist soil. Watering is a constant and critical consideration, especially when the temperatures spike.
A simple solution is to move the buckets into the shade or even indoors during temperature extremes, but you'll still need to water frequently and deeply. However, drain holes are always recommended for any plant growing in a bucket outdoors, so keep an eye on watering.
We’ll cover a wicking bucket option to keep any plant well watered as well. Mulching is another good idea. A thin layer of mulch across the top of the pot can help cut down on evaporation.
Soil
The proper soil mix will help retain moisture and actively feed your plants as well. The ideal soil mix varies with some fruits and vegetables, preferring not only a different blend in the soil mix, but an ideal pH. We’ll cover many of these variables in a chart that identifies the ideal conditions and pH for a range of fruits, herbs, and vegetables.
Feeding
A bucket is a small, highly contained biome and unlike soil in the ground, nutrients are not easily replenished. It always makes sense to add some plant food when you first fill your bucket, but a plant growing in a bucket will gradually consume the nutrients, so they should be replenished.
Whether you use a chemical fertilizer or keep things organic with compost is up to you. If adding compost, you might want to skip the mulching. Compost added to the top of the bucket will act as a mulch, and the nutrients may leach into the soil better without a layer of mulch acting as a barrier.
Temperature and Wind
Unlike anything growing in the ground, a plant in a bucket is more exposed to the heat, cold, and wind. This is largely due to the fact that the bucket is upright and above ground where all sides are exposed to wind and temperature extremes.
This combination can cause the soil and water in the bucket to freeze more quickly and dry out rapidly. Plus, the roots will be exposed to a much wider range of temperatures than they would be in the ground.
Because a bucket is more exposed, the stresses can take their toll on the vitality of the plant and could even kill it. One way to moderate temperature is to consider the color of the bucket. A white bucket will reflect sunlight in the summer while a black or dark colored bucket will absorb sunlight in cooler weather.
You could also move your buckets to an area that isn't exposed to the wind or direct sunlight.
About the Buckets
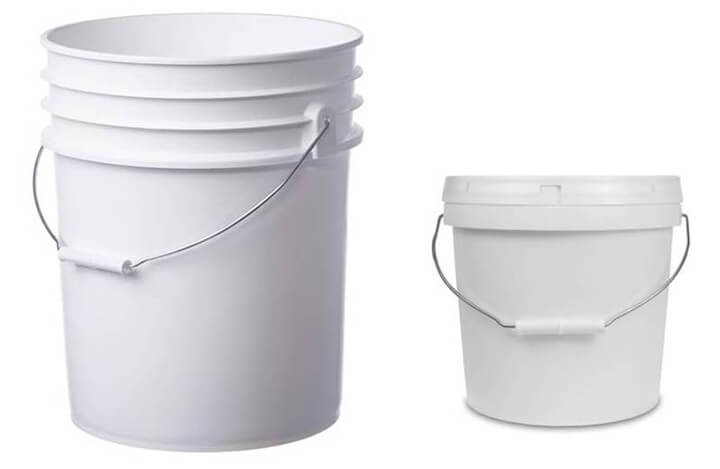
We’re going to focus on plastic buckets. 5-gallon and 2-gallon buckets are the ones commonly used for bucket gardening. What’s important is that they’re food-safe plastic. It usually says so on the bucket or label.
Drainage holes are also important, and we’ll show you the best way to do that, but there’s another option we’ll explore. It’s the idea of a wicking bucket which has a chamber or reservoir in the bottom of the bucket that holds water. The water is released through some carefully placed holes, and the reservoir is refilled through a pipe that leads to the top of the bucket.
The bucket is essentially self-watering as the soil mix literally wicks up the moisture from the reservoir and directs it to the roots of the plant. It’s not as complicated as it sounds, and an empty coffee can with a lid and a short length of PVC is all you need to make it work.
We’ll also cover some detail on how to make a potato bucket that makes both harvesting and inspection of progress easy to do.
Five-gallon plastic buckets will generally last 5 years or more if stored and stacked in a shaded area.
What Grows Best in a Bucket?
It makes sense that dwarf varieties of fruits and vegetables would do well in buckets, but any size of fruit or vegetable plant can survive and thrive in a bucket garden.
You may need to put in a stake or a narrow length of trellis to support some vining vegetables, but vertical gardening is an old and established practice, and everything from grapes to cucumbers to melons and traditional pole beans can produce just as much from a bucket as they do in a garden.
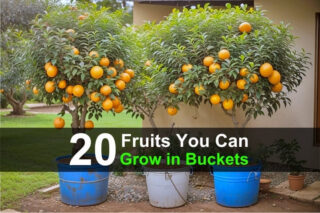
Trees are another possibility and once again, dwarf varieties make sense, but some varieties of conventional apple trees and pear trees can also grow in a bucket if pruned properly.
Just as important are bushes and shrubs that bear fruit, from blueberries to blackberries. We’ll cover the best options and varieties, but don’t hesitate to experiment. If you have enough buckets, it’s worth pushing the envelope.
Prepping the Buckets
There are two approaches to prepping a bucket to grow a plant. One approach is conventional and involves drilling holes in the base to allow drainage.
The other approach is the wicking bucket we mentioned. We’ll also get into soil mixes and how to fill your bucket so you’re ready for planting.
The Conventional Bucket
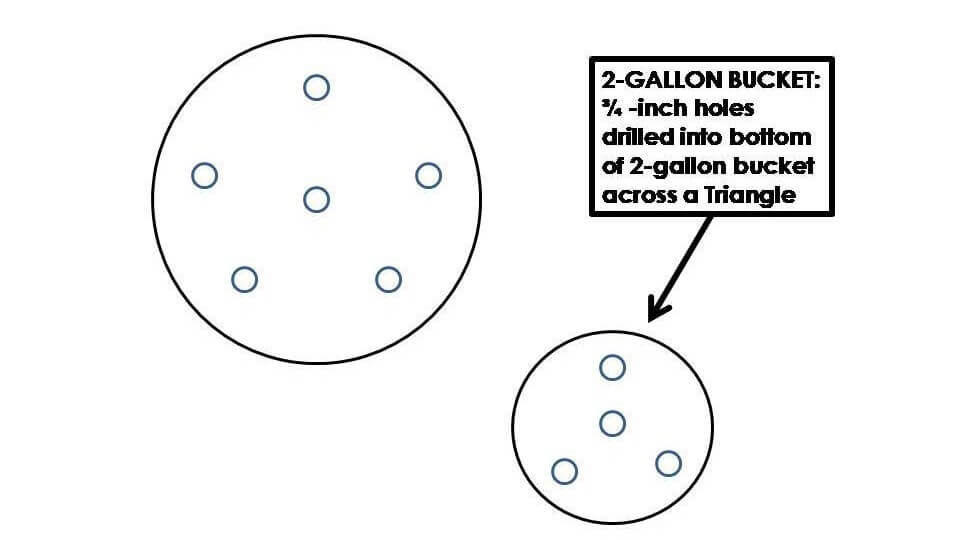
A standard practice is to drill 6 holes in the bottom of a 5-gallon plastic bucket. A 2-gallon bucket only needs 4 holes. Here are the steps:
Equipment:
- A drill
- A ¾-inch flat bit
Steps:
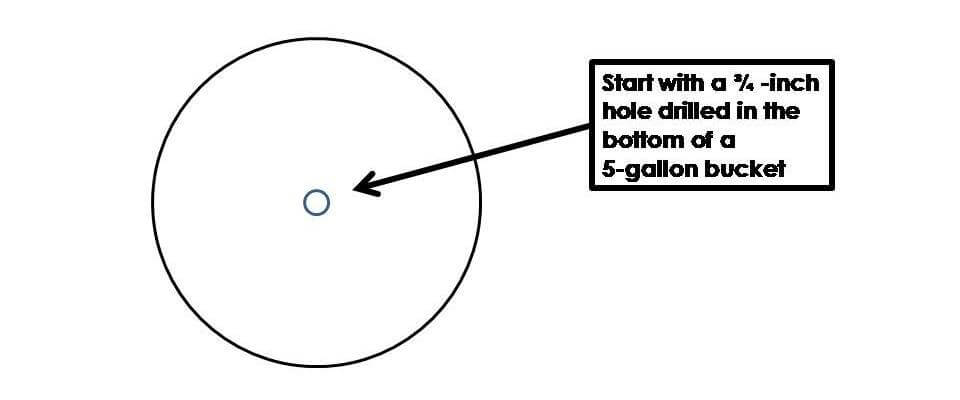
1. Turn the bucket upside down and place on a flat surface.
2. Drill a hole in the center.
A critical difference when drilling is to drill in reverse. This will prevent the plastic from shattering as the flat bit cuts through the plastic.
Use pulses as you drill into the plastic. Here again, you’re trying to cut a clean circle, and pulsing will also avoid shattering the bottom of the bucket.
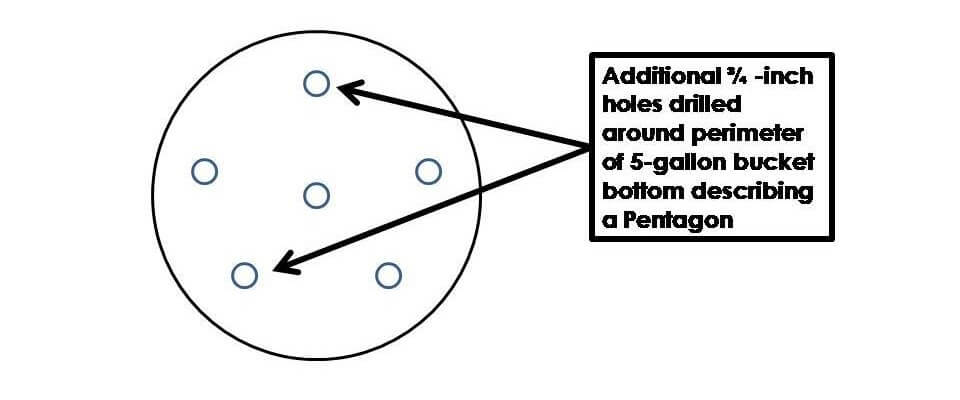
3. Once you’ve drilled the center hole, drill 5 more holes on the corners of a pentagon shape on a 5-gallon bucket, or…
4. Drill 3 holes on the corners of a triangle on a 2-gallon bucket.
5. Continue until you have drilled your drainage holes in all of your buckets.
Before we get into filling and adding soil, we’re going to cover the wicking bucket concept.
The Wicking Bucket
Wicking as a self-watering technique has been used in both garden beds and containers. The concept was developed in Australia where the arid, desert climate makes gardening a constant challenge. A self-watering setup allowed plants to survive severely high temperatures and keep the soil moist.
The basic concept is shown below. A small reservoir of water is contained under the soil at the base of the bucket to allow water to remain in contact with the soil.

Here are the steps for building a wicking bucket (a 5-gallon bucket works best):
Equipment:
- 5-gallon bucket
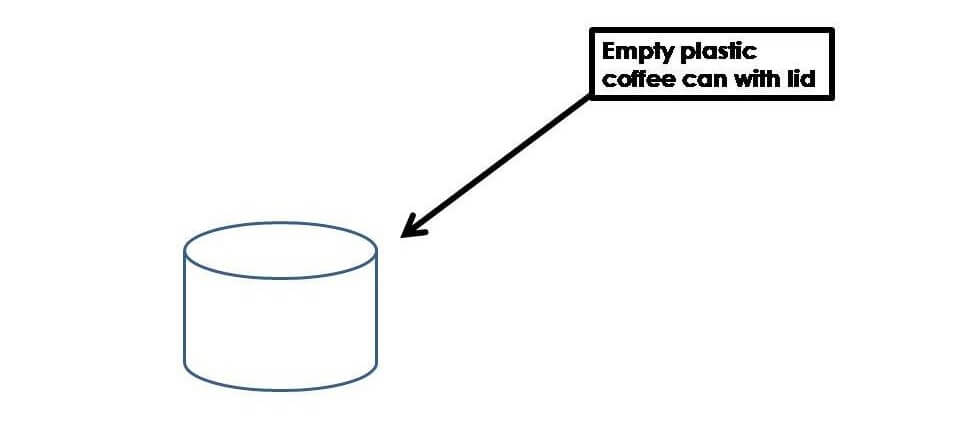
- Reservoir (small coffee can with lid, 1-gallon milk bottle, or any other plastic container that can be cut)
- A 1 to 2-inch diameter length of PVC, about 2-feet long
- Permanent marker
- Razor knife
Steps:
1. Start with an empty plastic coffee can with the lid firmly attached.
2. Drill 4 holes about 1 inch from the bottom of the plastic coffee can using a 1/4-inch drill bit.
3. Place the end of the PVC on one end of the coffee can lid and trace a circle around the circumference with a permanent marker.
4. Carefully cut out the hole. You want the PVC to fit tightly so no soil works into the reservoir.
5. Drill 2 ¼-inch holes into the side of the 5-gallon bucket, about 5-inches from the base.
This is to allow excess water to drain from the bottom of the bucket and prevent root rot.
6. Cut a 1 ½-inch piece of PVC pipe to 20-inches long. Cut one end of the PVC at a 45 degree angle and place the sharp tip of the PVC at the bottom of the reservoir so the water sufficiently drains into the coffee can or milk bottle.

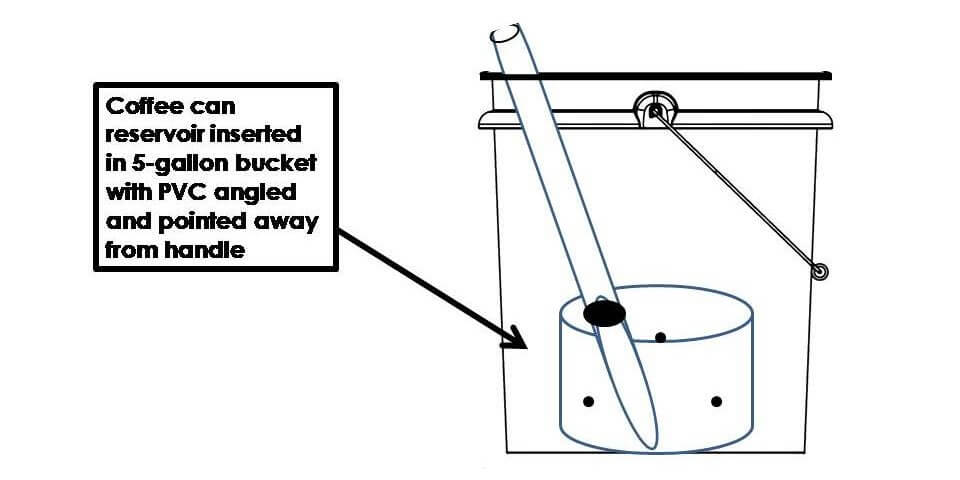
7. Place the PVC into the hole and angle it towards one side of the bucket. It’s best to angle it towards the center between the two metal handles so you can still lift and move the bucket.
8. If you see a large gap where the PVC goes into the reservoir, either seal it with some tape or a bead of silicone. It doesn’t have to be waterproof, you’re just trying to keep the soil mix out.
9. You’re now ready to fill the bucket with your soil mix.
Filling the Bucket
These steps for filling the bucket apply to both a conventional bucket or a wicking bucket. You’re basically adding a potting soil and a small amount of soil amendment in form of a fertilizer.
You can buy a prepared potting soil or mix up your own. Most fruits and vegetables will survive and thrive in a good potting soil, but we’ll cover some adjustments for plants like fruit trees and others that prefer a specific pH or soil amendment in the chart.
Supplies:
- Potting Mix
- Or – combine 1 part peat moss, 1 part Perlite, and 2 parts compost to make your own potting mix.
- A controlled release fertilizer like Osmocote or Nutricote. These are not organic. Organic slow release fertilizers include Sustane and Plant-Tone. Composted manure is another option.
Steps:
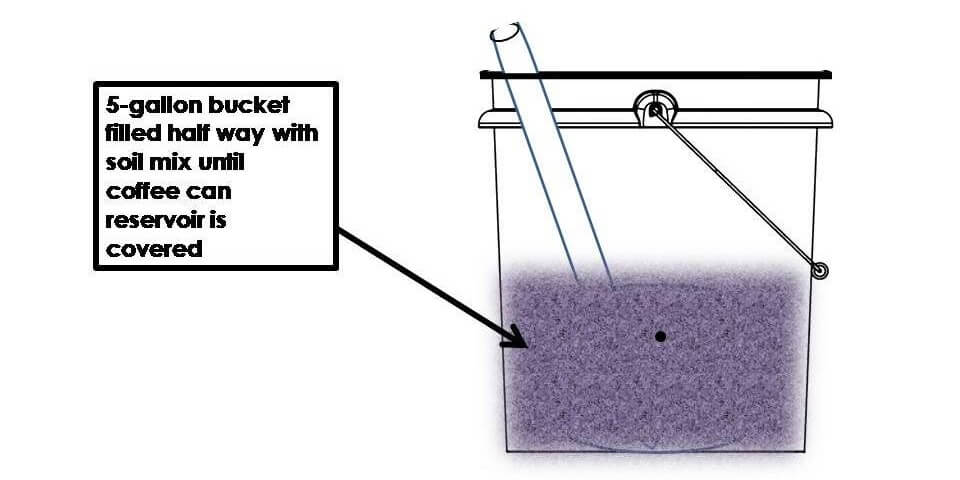
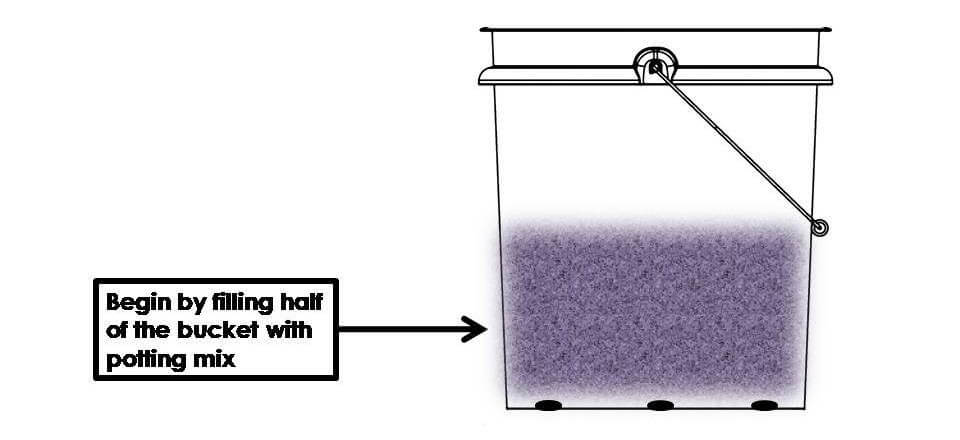
1. Fill the bucket ½ way with the potting mix.
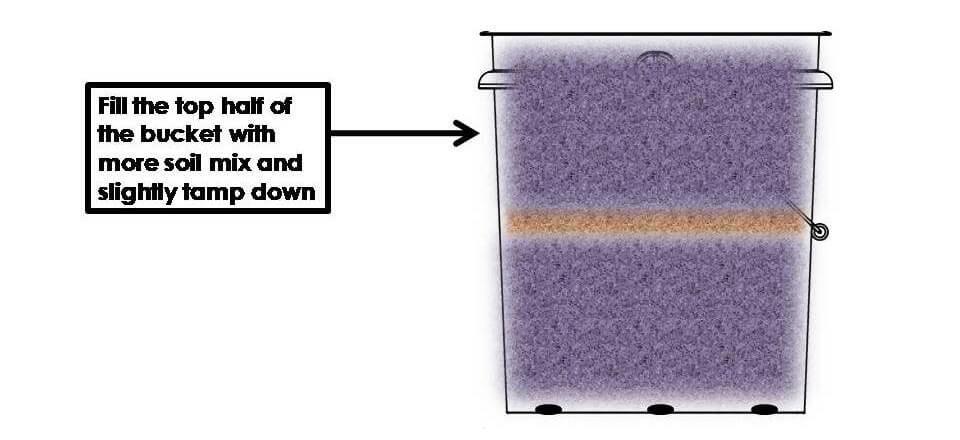
2. Top the potting mix with a cup or less of the fertilizer. It’s wise to read the label directions to make sure the proportions are right. If adding composted manure, cover the first layer of potting soil with an inch of compost.

3. Add more topsoil and gently press down until the soil mix is about an inch from the top of the bucket.
4. An optional step is to add a layer of mulch to the top of the soil.
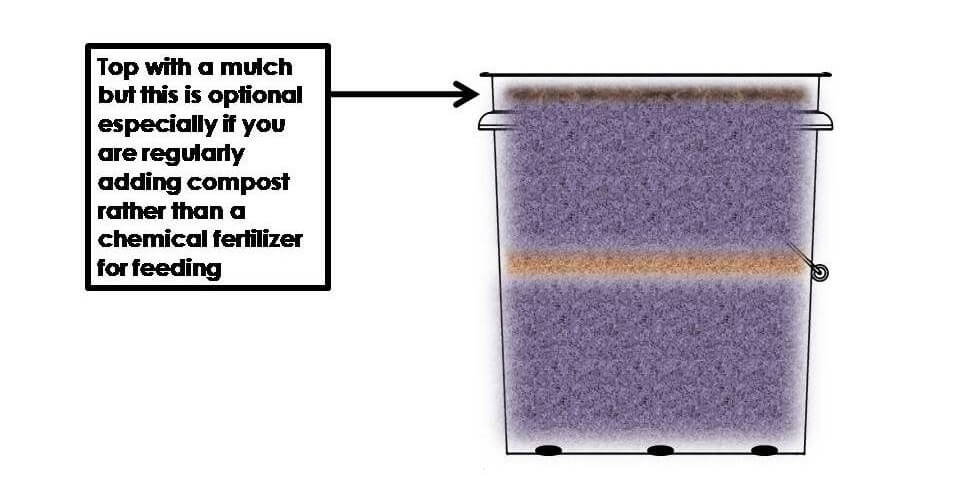
Follow the same steps to fill a wicking bucket with soil.
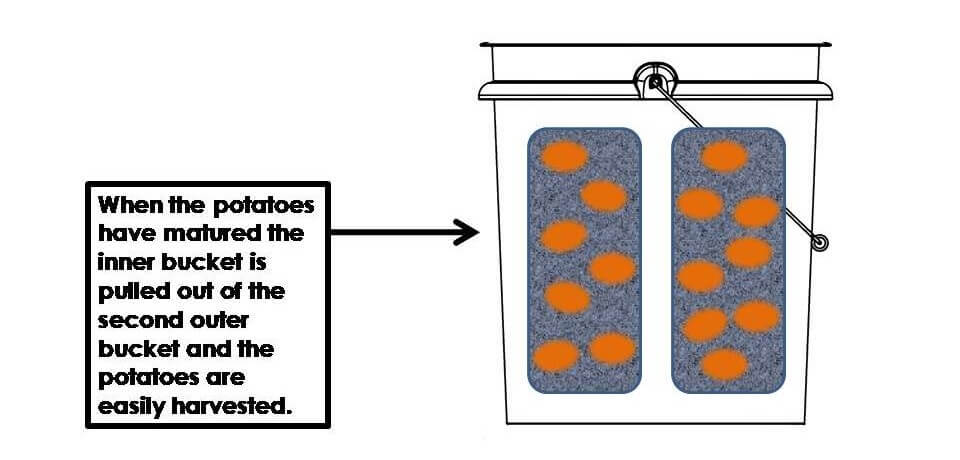
The Potato Bucket
Another great bucket design is for potato crops. This design makes it easy to harvest the potatoes and check their progress during the season.
Equipment:
- Razor knife
- Soil mix of compost and topsoil
Steps:
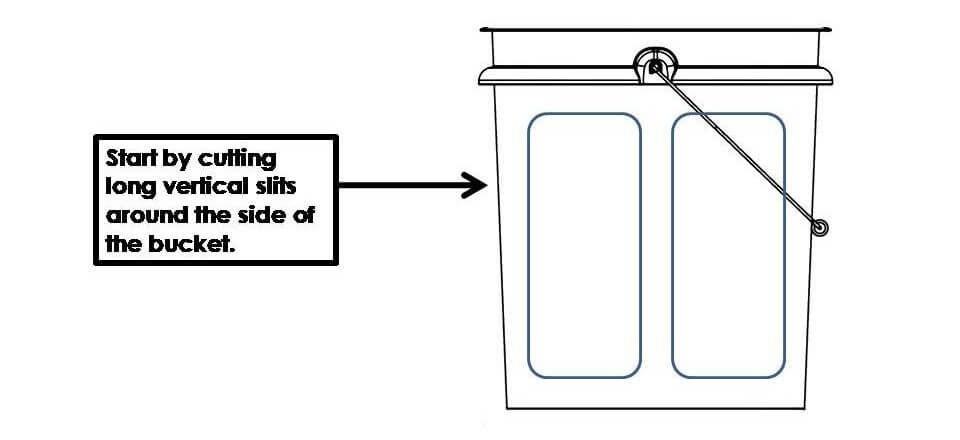
1. Cut long, vertical strips in the sides of the bucket.
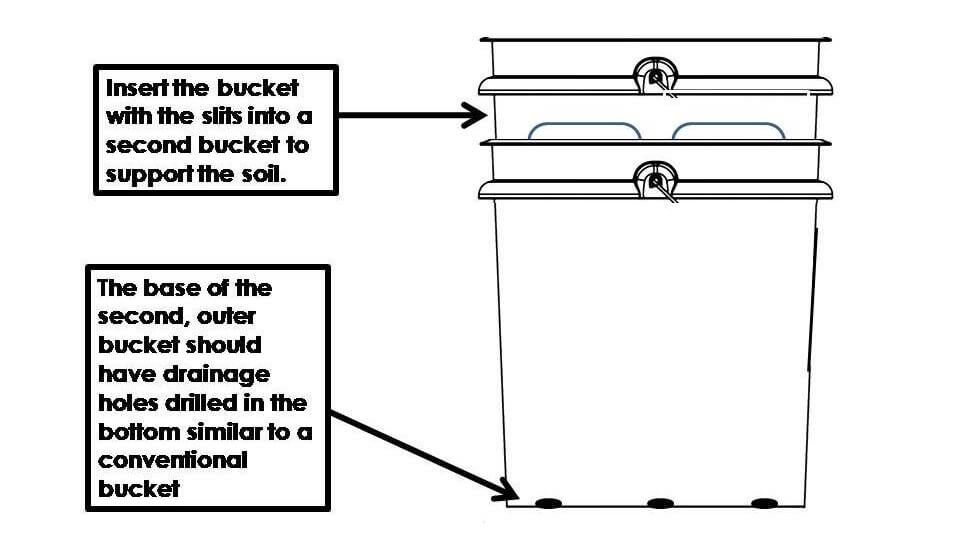
2. Insert the first bucket with the slits into a second bucket with holes drilled in the bottom, similar to a conventional bucket design.
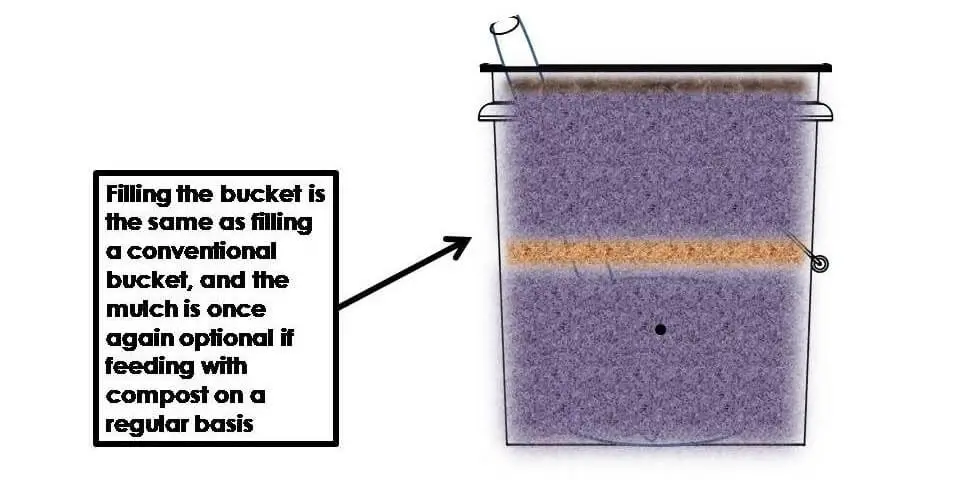
3. Fill the bucket with a 50/50 mix of compost and topsoil.

4. To harvest or check on progress, pull the inner bucket up and out and inspect the crop or harvest.
Planting
Planting follows the same process for planting in a garden or container. Just make sure the soil is sufficiently pressed down around the roots and water immediately, and then water again after about 10 minutes.
If you've constructed a wicking bucket, water the top of the bucket in a conventional way, then fill the PVC feed tube until the reservoir is filled and you can see the water in the bottom of the tube.
Charts for Bucket Gardens
The data in the charts below represents averages and can vary with some plant varieties. Check the seed package or the printed stake insert in potted plants for details specific to the variety you choose.
Generally, all fruits and vegetables prefer a standard potting mix resulting in a loamy, well-drained soil. pH levels tend to fall in the mid-range a little above and below a neutral pH of 7.0
Maturity rates vary widely, so always double check maturity if you have a short growing season or want to do succession planting.
Hardiness zones typically represent a broad range from 2 to 11, but keep an eye on the zones if you live in one of the end zones in the range.
Bucket Gardening Vegetables
| VEGETABLES | BUCKET SOIL DEPTH | IDEAL SOIL MIX & pH | HARDINESS ZONES | DAYS TO MATURITY | NOTES & BUCKET SIZE |
|---|---|---|---|---|---|
| Arugula | At least 6-inches | Loamy, moist | 1 - 11 | 35 to 50 days | 2-gallon |
| Beets | At least 8-inches | Loamy, pH 6.0 - 8.0 | 3 - 11 | 40 to 70 days | 2-gallon |
| Bell Peppers (Sweet, Poblano, etc) | At least 10-inches | Loamy, pH 6.0 - 6.5 | 5 - 11 | 70 to 90 days | Stake, 2-gallon |
| Bok Choy | At least 12-inches | Loamy, pH 7.0 and up | 3 - 10 | 50 to 65 days | Shade tolerant, 5-gallon |
| Broccoli | At least 12-inches | Firm, pH 7.0 and up | 2 - 11 | 60 to 65 | Shade tolerant, 5-gallon |
| Brussels Sprouts | At least 12-inches | Firm, pH 7.0 and up | 2 - 10 | 90 to 100 days | Shade tolerant, 5-gallon |
| Bush Beans | At least 10-inches | Loamy soil | 3 - 13 | 70 to 75 days | 2-gallon bucket |
| Cabbage | At least 12-inches | Firm, pH 7.0 and up | 2 - 11 | 60 to 80 days | Shade tolerant, 5-gallon |
| Carrots | At least 10-inches | Loamy, pH 6.0 - 8.0 | 2 - 11 | 45 to 75 days | 5-gallon |
| Cauliflower | At least 12-inches | Firm, pH 7.0 and up | 2 - 10 | 65 to 80 days | Shade tolerant, 5-gallon |
| Collard | At least 10-inches | Loamy, moist | 6 - 11 | 40 to 60 days | 5-gallon |
| Cucumbers | At least 12- inches | Loamy, moist, pH 6.0 - 7.0 | 4 - 11 | 50 to 70 days | Stake or trellis, 5-gallon |
| Eggplant | At least 12-inches | Loamy, moist, pH 5.5 - 6.8 | 5 - 12 | 65 to 85 days | Warm temps and lots of water, 5-gallon |
| Garlic | At least 6-inches | pH 6.0 - 6.5 | 5 - 11 | 75 to 100 days | 2-gallon |
| Kale | At least 8-inches | Moist, pH 6.5 - 7.0 | 2 - 10 | 50 to 70 days | Shade tolerant, 2-gallon |
| Large Tomatoes (Beefsteak, etc.) | 14 to 16-inches, Prefers slightly acidic soil | Loamy, well-drained, pH 6.0 - 6.5 | 2 - 11 | 75 to 85 days | Full sun, staked, 5-gallon |
| Leaf Lettuce | At least 6-inches | Loamy, moist | 5 - 11 | 40 to 55 days | 2-gallon |
| Onions | At least 8-inches | pH 6.0 - 6.5 | 5 - 11 | 70 to 90 days | 2-gallon |
| Parsnips | At least 12-inches | Loamy, pH 6.0 - 8.0 | 3 - 11 | 105 to 115 days | 5-gallon |
| Peas | 8 to 12 inches | Loamy, well-drained | 2 - 11 | 50 to 60 days | Full to partial sun, stake, 2-gallon |
| Peppers, Hot (Serrano, Jalapeno, etc) | At least 8-inches | Loamy, pH 6.5 - 7.0 | 6 - 11 | 65 to 80 days | 2 or 5-gallon buckets |
| Pole Beans | At least 12 inches, | Loamy, well-drained, pH 6.0 - 6.8 | 2 - 11 | 55 to 65 days | Full to partial sun, 6-ft stake, 5-gallon |
| Potatoes, red | At least 16-inches | Loamy, pH 6.0 - 6.5 | 3 - 10 | 80 to 100 days | 5-gallon potato bucket |
| Potatoes, russett | At least 16-inches | Loamy, pH of 6.0 - 6.5 | 3 - 10 | 100 to 130 days | 5-gallon potato bucket |
| Potatoes, sweet | At least 16-inches | Loamy, pH 5.8 - 6.0 | 5 - 11 | 90 to 120 days | 5-gallon potato bucket |
| Radishes | At least 8-inches | Loamy, pH 6.0 - 8.0 | 2 - 11 | 30 to 50 days | 2-gallon |
| Romaine | At least 8-inches | Loamy, moist | 5 - 11 | 50 to 70 days | 2-gallon |
| Rutabagas | At least 12-inches | Loamy, pH 6.0 - 8.0 | 2 - 11 | 80 to 90 days | 5-gallon |
| Spaghetti Squash | At least 12-inches | Well-drained, pH 6.0 - 6.8 | 2 - 11 | 100 to 110 days | Full sun, narrow trellis, 5-gallon |
| Spinach | At least 6-inches | Loamy, moist | 4 - 11 | 30 to 40 days | 2-gallon |
| Tomatoes, Dwarf (Cherry, Grape, etc) | At least 12-inches. Prefers slightly acidic soil | Loamy, well-drained, pH 6.0 - 6.8 | 2 - 11 | 50 to 65 days | Full sun, stake, 5-gallon |
| Tomatoes, Medium (Roma, Tomatillo, etc.) | 12 to 14-inches. Prefers neutral soil | Loamy, well-drained, pH 7.0 | 3 - 11 | 50 days | Full sun, stake, 5-gallon bucket |
| Turnips | At least 8-inches | Loamy, pH 6.0 - 8.0 | 3 - 11 | 30 to 45 days | 2-gallon |
| Watermelon (Dwarf) | At least 12-inches | Loamy, moist, well-drained, pH 6.0 - 6.8 | 4 - 11 | 70 to 90 days | Full sun, narrow trellis, 5-gallon |
| Zucchini | At least 12-inches | Loamy, moist | 6 - 12 | 75 to 90 days | 5-gallon |
Bucket Gardening Fruits
| FRUITS | BUCKET SOIL DEPTH | IDEAL SOIL MIX & pH | HARDINESS ZONES | DAYS TO MATURITY | NOTES & BUCKET SIZE |
|---|---|---|---|---|---|
| Apple, Dwarf | — | Sand loam, pH 6.0 - 7.0 | 4 - 9 | 2 to 3 years from seed | 5-gallon wicking bucket |
| Blackberries | At least 16-inches | Sandy loam, pH 5.5 - 6.5 | 5 - 9 | 3 years from seed | 5-gallon |
| Cherry, Dwarf | — | Sandy loam, pH 6.0 - 7.0 | 4 - 8 | 2 to 3 years from seed | 5-gallon wicking bucket |
| Grapes | At least 16-inches | Loamy soil, pH 5.5 - 6.5 | 5 - 9 | 3 to 4 years from seed | 5-gallow, narrow trellis |
| Lemon, Dwarf | — | Sandy loam, pH 6.0 - 7.0 | 8 - 11 | 2 to 3 years from seed | 5-gallon wicking bucket |
| Orange, Dwarf | — | Sandy loam, pH 6.0 - 7.0 | 8 - 11 | 3 to 4 years from seed | 5-gallon wicking bucket |
| Peach, Dwarf | — | Sandy loam, pH 6.0 - 7.0 | 5 - 9 | 2 to 3 years from seed | 5-gallon wicking bucket |
| Raspberry | At least 16-inches | Loamy soil, pH 5.5 - 6.5 | 4 - 9 | 3 years from seed | 5-gallon |
| Strawberries | At least 8-inches | Loamy soil, pH 5.3 - 6.5 | 4 - 9 | 60 to 90 days | 2-gallon ok |
Bucket Gardening Herbs
| HERBS | BUCKET SOIL DEPTH | IDEAL SOIL MIX & pH | HARDINESS ZONES | DAYS TO MATURITY | NOTES & BUCKET SIZE |
|---|---|---|---|---|---|
| Basil | At least 6-inches | Well-drained, pH 6.0 - 7.5 | 5 - 11 | 30 to 45 | Very sensitive to cold temps, 2-gallon ok |
| Chamomile | At least 6-inches | Well-drained, pH 6.0 - 7.5 | 3 - 11 | 35 to 50 | Annual but reseeds prolifically, 2-gallon ok |
| Chives | At least 6-inches | Well-drained, pH 6.0 - 7.0 | 4 - 11 | 30 to 40 | Okay for 2-gallon |
| Cilantro (Coriander) | At least 8-inches | Well-drained, pH 6.0 - 7.5 | 5 - 11 | 30 to 75 | 2-gallon ok |
| Dill | At east 6-inches | Well-drained, pH 6.0 - 7.5 | 3 - 11 | 30 to 60 | Annual but also reseeds widely, 2-gallon ok |
| Fennel | At least 12-inches | Well-drained, pH 6.0 - 8.0 | 4 - 11 | 80 to 95 days | 5-gallon |
| Lavender | At least 10-inches | Well-drained, pH6.7 - 7.3 | 5 - 11 | 45 to 60 | 5-gallon is best |
| Lemon Balm | At least 10-inches | Well-drained, pH 6.0 - 7.0 | 5 - 11 | 40 | 5-gallon is best (perennial) |
| Mint | At least 10-inches | Well-drained, pH 6.0 - 7.0 | 5 - 11 | 30 | 5-gallon is best (perennial) |
| Oregano | At least 8-inches | Well-drained, pH 6.0 - 7.5 | 5 - 11 | 30 | Okay for 2-gallon |
| Parsley | At least 6=inches | Well-drained, pH of 6.0 to 7.5 | 3 - 11 | 30 to 45 | 2-gallon ok |
| Rosemary | At least 8-inches | Well-drained, pH 6.0 - 7.0 | 5 - 11 | 45 | Okay for 2-gallon |
| Sage | At least 8-inches | Well-drained, pH 6.0 - 7.5 | 5 - 11 | 40 to 55 | Okay for 2-gallon |
| Stevia | At least 10-inches | Well-drained, pH 6.0 - 7.5 | 4 - 11 | 40 to 70 | Might need to be staked, 2-gallon |
| Tarragon | At least 10-inches | Well-drained, pH 6.0 - 7.5 | 4 - 11 | 30 to 45 | 5-gallon is best (perennial) |
| Thyme | At least 6-inches | Well-drained, pH of 6.0 to 7.5 | 5 - 11 | 40 | Okay for 2-gallon (perennial) |
Like this post? Don't Forget to Pin It On Pinterest!
You May Also Like: