

Estimated reading time: 23 minutes
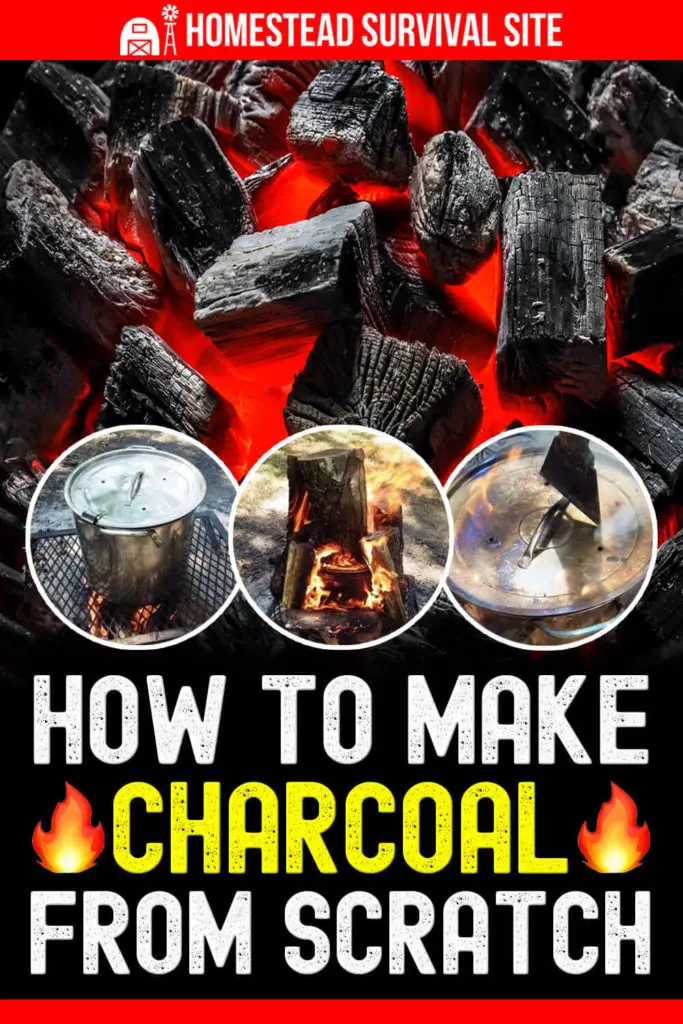
For many people the idea of charcoal is defined by briquets bought at the store that are used for grilling and barbecues. It’s a good product and works pretty well in a Weber but they’re somewhat expensive and are made with a bit of a complicated process with added chemicals and binders to hold the briquet shape.
There’s another form of charcoal called lump charcoal that’s also sold in bags and is usually twice the price.
Many people prefer this charcoal because it burns hotter and is a pure form of charcoal without the additives to create a briquet. The only downside is that it burns faster than a briquet but lasts more than long enough for any domestic tasks like grilling a steak or barbecuing chicken or ribs.
The good news is that lump charcoal is easy to make if you live in a neighborhood that will tolerate a smoky fire that burns for a while.
Want to save this post for later? Click Here to Pin It On Pinterest!
It’s Not Just About Cooking
The reason many people make their own charcoal goes beyond grilling. Lump charcoal is an excellent source of heat for blacksmithing, pottery firing, glass making; artwork using charcoal as a drawing medium, and as a surprising antidote for poisoning and water filtration called “activated charcoal.”
All of these uses are derived from a basic charcoal making process and with some simple tools, equipment and time you can make your own.
A Brief History of Charcoal
Books have been written about charcoal and it’s been around for thousands of years. Most ancient uses were small scale and its first significant usage beyond cooking was for primitive metal smelting and small-scale pottery manufacture. If you’ve heard of the bronze-age and the iron-age you can thank charcoal for making those happen.
It was the Industrial Revolution that expanded and elevated the use of charcoal for iron works, steel mills, commercial glass making and other industries that required the high heat from charcoal without the harmful contaminants often found in coal.
A cottage industry sprung up around charcoal manufacture in smoldering mounds where men called “Colliers” cut and stacked wood and then packed dirt around a slow and smoldering pile of burning wood.

It was literally a dirty job and people had a low opinion of the colliers who lived in mud huts next to their smoking charcoal mounds.
Charcoal was only occasionally used for outdoor cooking but Henry Ford changed all that when he determined that a by-product from his steel mills could be up-cycled to create a charcoal product ideal for outdoor cooking.

The concept of charcoal briquets was born and the Kingsford charcoal company was the result. For the first time the concept of charcoal for backyard and camp cooking emerged as a new activity pursued by almost everyone to this day.
The Basic Science of Charcoal Making
On a basic level, charcoal is made from wood that is heated but significantly deprived of enough oxygen to prevent the wood from bursting into flame and combusting. The intense heat of charcoal-making drives off any moisture and gases in the wood leaving behind concentrated carbon that will still burn, but typically as a low bed of hot coals rather than a flaming fire.
Look for the Flaming Gas Jets
The key sign you’re looking for when making charcoal are the escaping gases sprouting into flames from the vents in your charcoal container. That means the moisture and gases are not only being released but consumed by fire outside of the container.
In essence, you’re slow roasting wood to make charcoal.
When the heat from homemade charcoal needs to be elevated for metal, pottery or glass making various methods are used to direct oxygen or air over the charcoal raising the heat. Most people at home or on a homestead don’t need this level of heat but if you’ve ever done any blacksmithing you’re familiar with the fans and contraptions to direct air over a bed of coals to raise the temperature of the charcoal.
The Best Woods for Charcoal
Natural woods are best as opposed to commercially treated woods that may have varying degrees of chemicals added to make them water and rot resistant. A lot depends on your final use for the charcoal.
If you’re planning on doing a little iron making from iron ore any type of wood will do, but for cooking, water filtration, artwork, or making activated charcoal -a pure, natural wood is highly recommended.
Hardwoods Are Best
The best homemade charcoal comes from hardwoods like oak, maple, hickory, walnut and cherry. There are others but those are the most common. Softwoods can work and are sometimes used for art charcoal especially willow.
As a general rule though, softwoods are a poor choice for cooking or any kind of use that requires a long duration burn. Softwoods burn fast in a fire and softwood charcoal burns up even faster.
Many softwoods also have some chemical compounds you might not want to introduce when cooking, filtering water or ingesting as activated charcoal. Pines are a softwood that have resins that mostly burn off in a charcoal making process but some still reside in the carbon. It’s another reason to stick with hardwoods for charcoal making.
However, there are also a few exceptions in hardwoods. Some hardwoods like birch and cedar have their share of chemical compounds that aren’t best for cooking or anything else you might ingest like filtered water.
If you’ve ever watched birch burn you’ve no doubt noticed the black smoke emerging from the fire. That’s a pretty good sign there’s something in the wood that will affect the flavor of cooked food or filtered water.
Green wood or Dead wood?
Both green wood and seasoned or “deadwood” can be used for making charcoal. The process burns off any moisture or compounds in green wood. You may want to avoid mixing them in the same batch though.
Green wood takes longer to carbonize and turn into charcoal and if you roast your dead woods too long with your green wood you’ll end up with some softwood charcoal that’s light as a feather and burns like tinder. Timing is important and mixing green wood with dead wood complicates everything.
On the other hand, there’s no problem combining green woods from various hardwood trees. Just try to separate the green from the dead when you make a batch.
Size Doesn’t Matter
The size of the wood chunks or pieces you use to make charcoal are not critical. The pieces can be of various sizes.
After the charcoal is done you can always (and easily) break apart larger pieces to the size you want. The only size consideration is the size of your container or area where you’re making the charcoal.
The one benefit of trying to keep your wood chunks or pieces at least somewhat similar in size is the timing consideration. Larger pieces will take longer and smaller pieces may get over carbonized as a result. Don’t get too fussy about it and you’ll learn as you go. (Assuming you do this more than once.)
4 Charcoal Making Projects
We’re going to cover 4 forms or types of charcoal and how to make them. They include:
- Lump Charcoal
- Artwork Charcoal
- Writing Charcoal
- Activated Charcoal
These 4 types of charcoal will give you the fundamental resource to accomplish a range of tasks from cooking to blacksmithing to water filtration and more. It just depends on what you need to do when you need charcoal.
We’re also going to use a simple, small-scale process. There are plenty of books about making a Collier’s mound the size of house if you want to go into the charcoal making business, but we’re going to emphasize the concept of the process on a smaller scale. From there you can always scale it up to larger containers or methods.
1. How to Make Lump Charcoal
Equipment:
- A fire pit
- A metal container with a lid
- A fire grate or some way to support the container
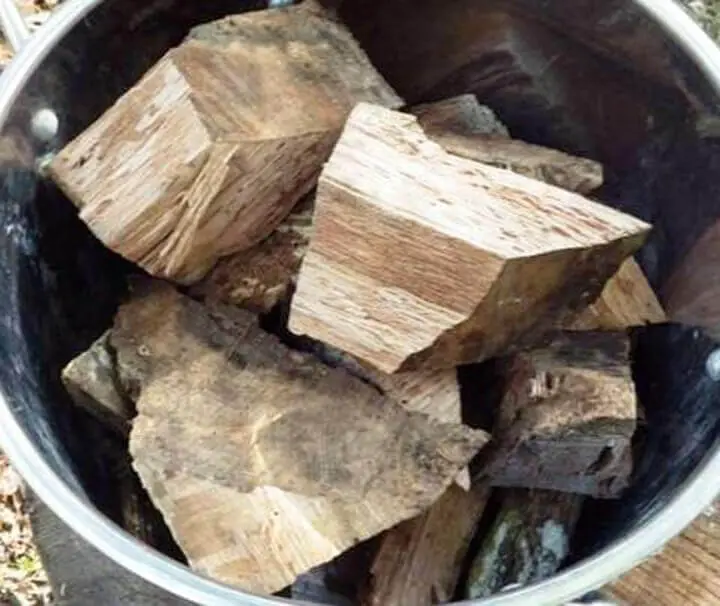
- Hardwood chunks
- Wood for your fire
The most important piece of equipment is the metal container that will hold your wood chunks and reduce the flow of oxygen to the wood.
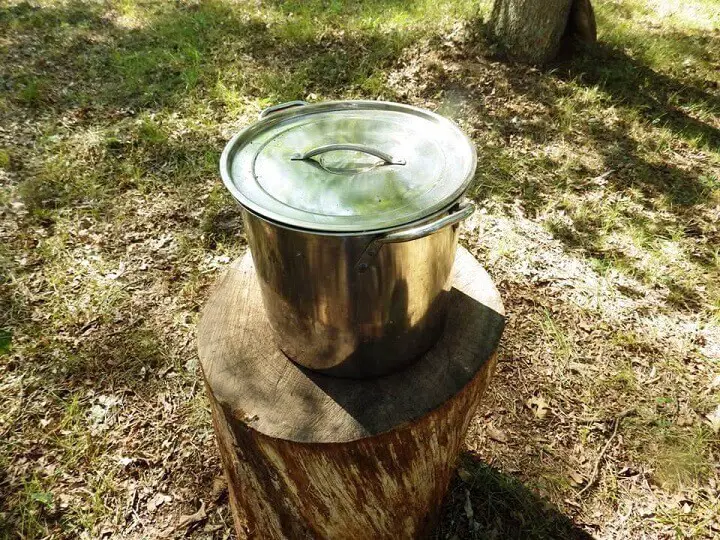
We’re using an old (and cheap) steel stockpot with a lid. You can scale this metal container up or down depending on the size of your fire and the amount of wood chunks you’re trying to carbonize.
A 55-gallon drum is about the top end for most home charcoal making down to a metal coffee can for small batches. The timing will vary but the jets of flame emerging from the vents will give you a good indication of progress and we’ll get into that as we go through the steps.
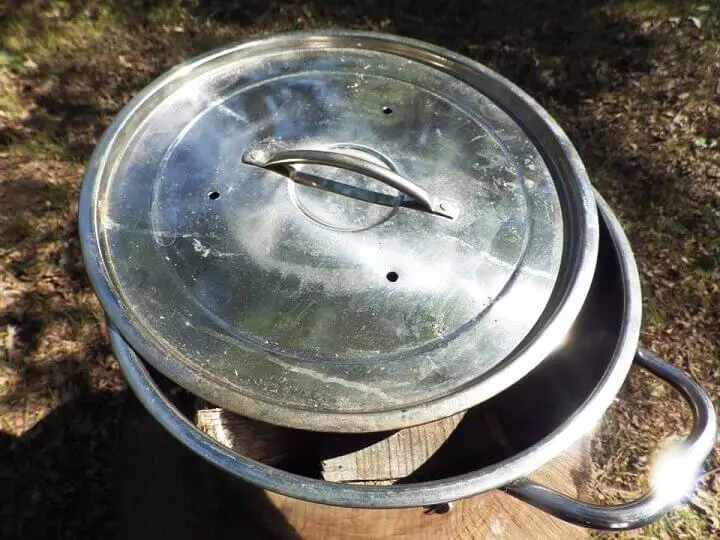
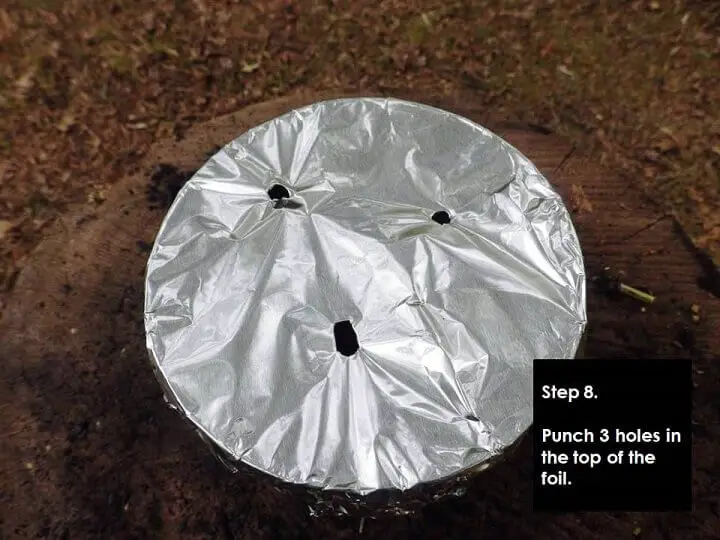
Any container used for charcoal making requires at least 3 holes in the top of the container to allow the gases to escape.
DO NOT put any holes on the sides or bottom of the container. That will draw air into the container and your wood will combust. Keep your holes only at the top.
Here’s the process step by step:
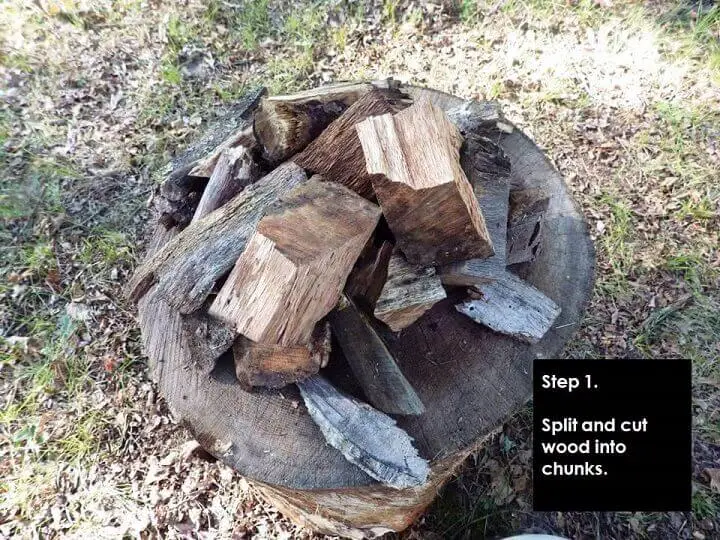
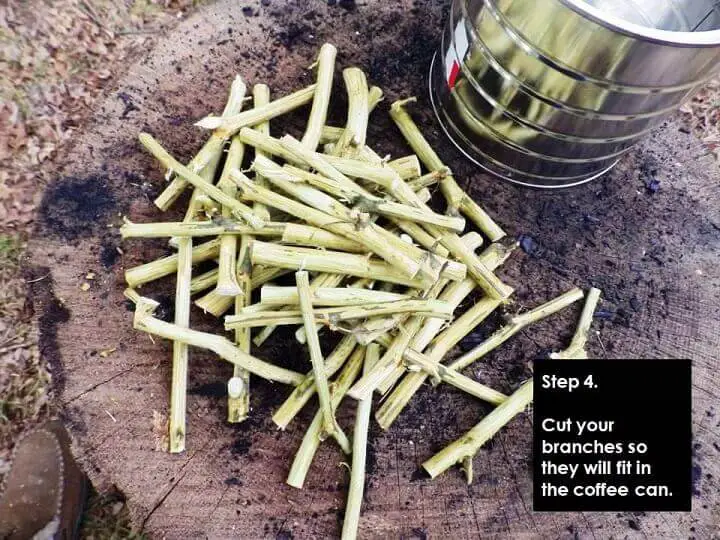
You’ll want your wood chunks to be small enough to fit into your container. Size can vary but if they are approximately equal in size, your timing and overall result will be better.
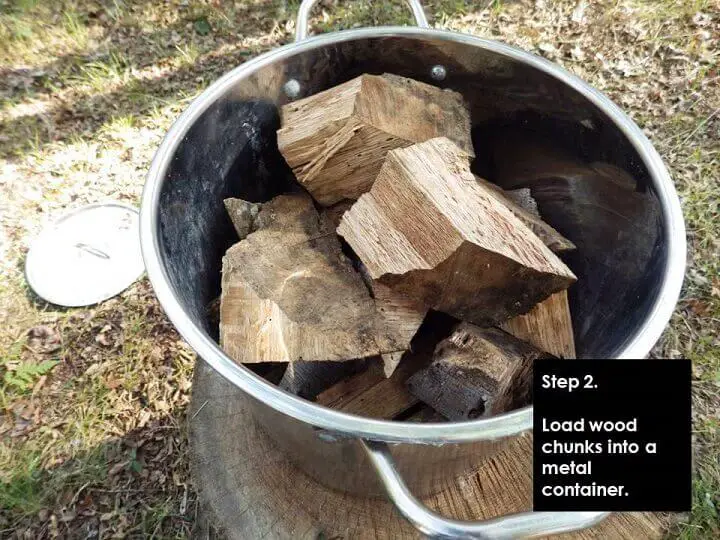
Dump the wood chunks into your metal container. They should be in a random, loose arrangement. Try to be consistent with the age of your wood. Use either all green woods or all dead woods so they carbonize at roughly the same time.
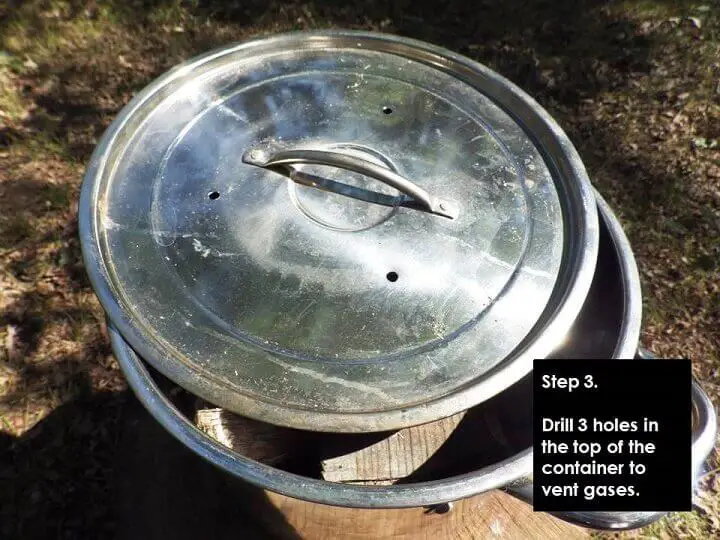
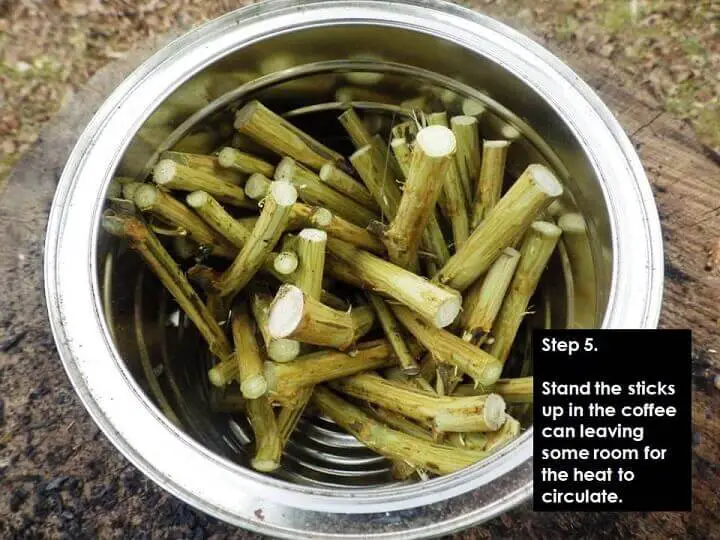
If you haven’t already done so, drill 3 vent holes at the top of your container. Do not drill holes on the sides or bottom. Only the top.
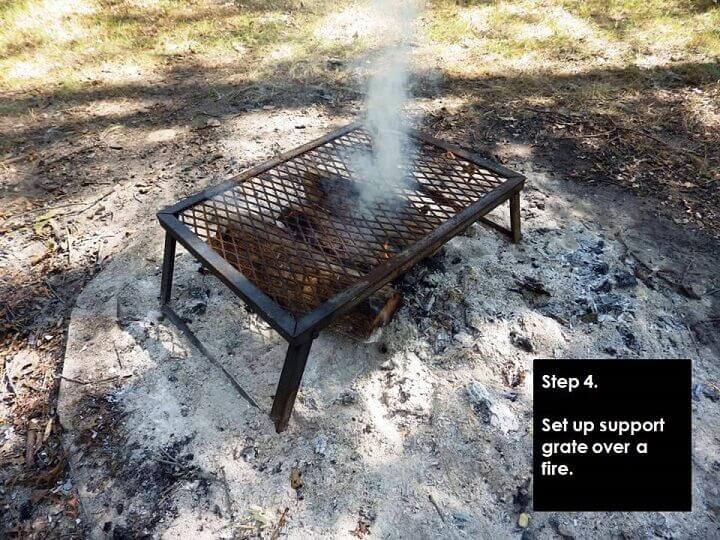
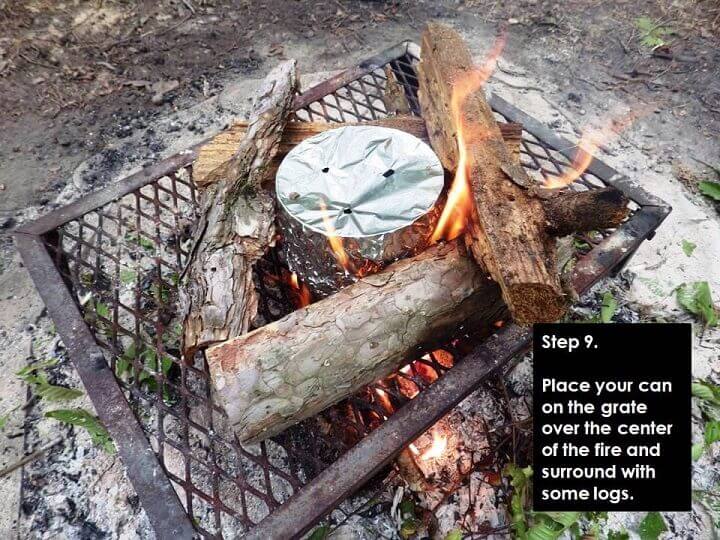
Set up a grate or stand over an established and burning fire. You want a stable support so your container does not shift or fall over.

Make sure the container is centered over the hottest part of the fire.
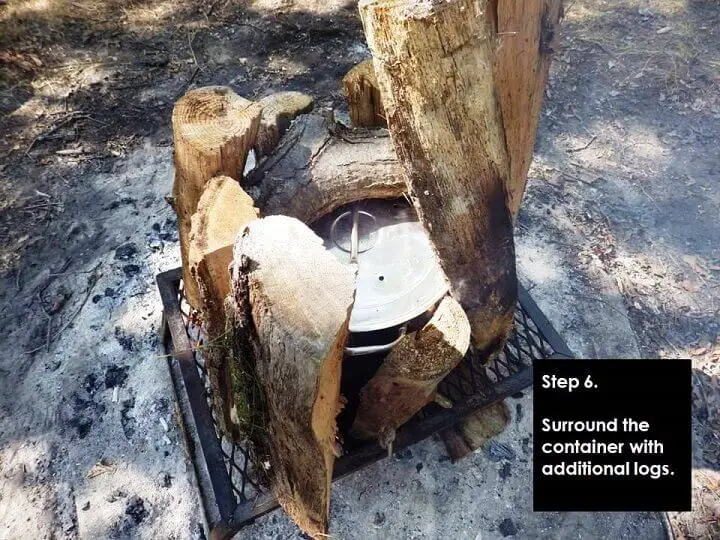
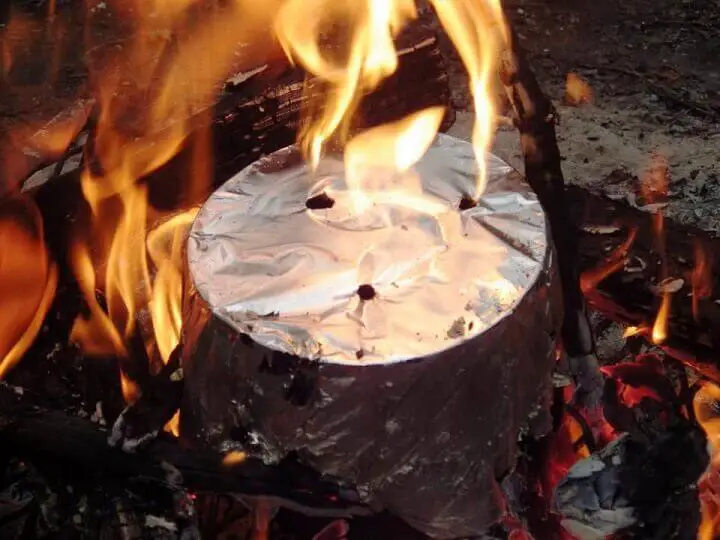
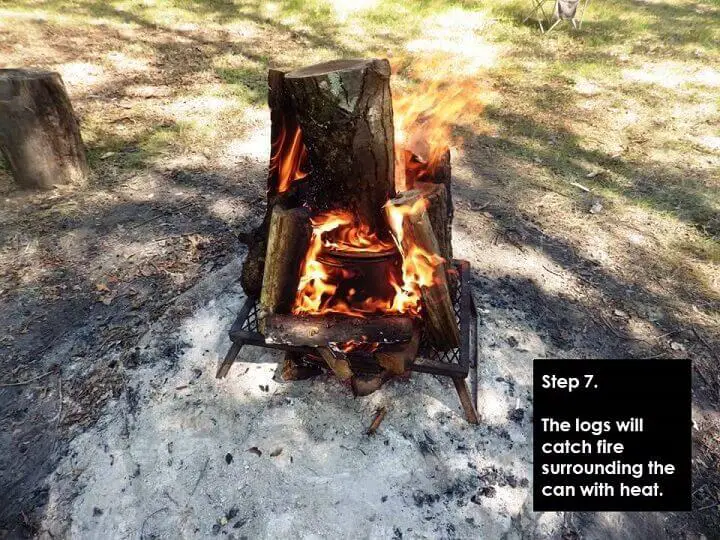
Additional logs around the perimeter of the container will eventually catch fire and further raise the temperature of the can’s interior.
Allow the flames to burn for 30 to 45 minutes. After that time the fire should subside to some degree. If you need to, you can prop a log on top of the lid to prevent air from entering. This timing can vary. If using a large 55-gallon drum you may need to let it burn for an hour to an hour and a half or more.
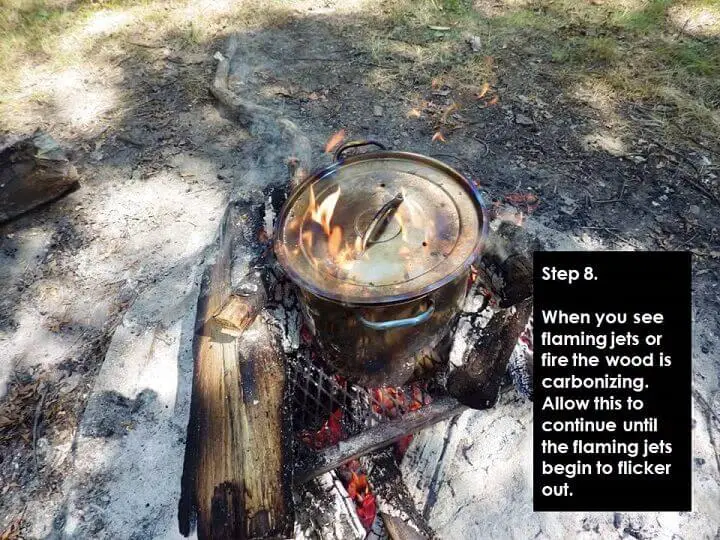
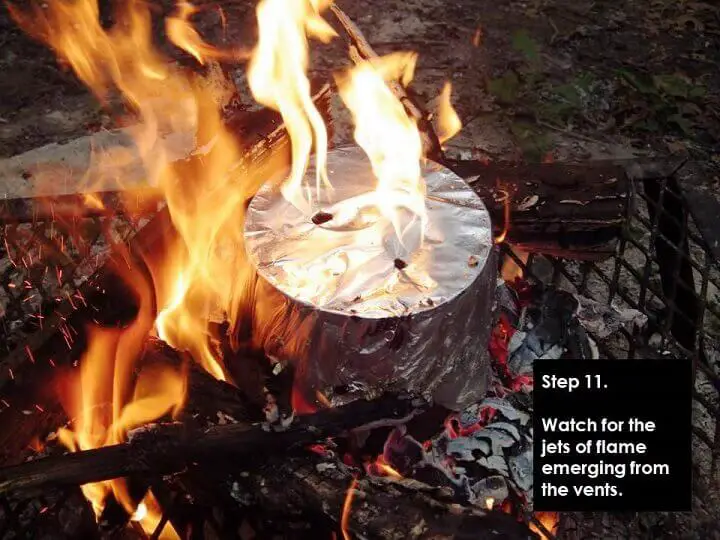
Eventually you’ll notice that the gases exiting from the top vent holes catch fire. That’s good. That means the escaping gases are being consumed and the wood chunks are carbonizing.
You don’t want the wood inside to catch fire. You want to roast them in an oxygen free environment. The appearance of these gas jets means you are rapidly approaching the end of the process but let them burn.

As the fire goes out underneath your container the vent holes will continue to flicker with flames. If needed, hold down the lid and let the vent continue to burn until they start to flicker and sputter.

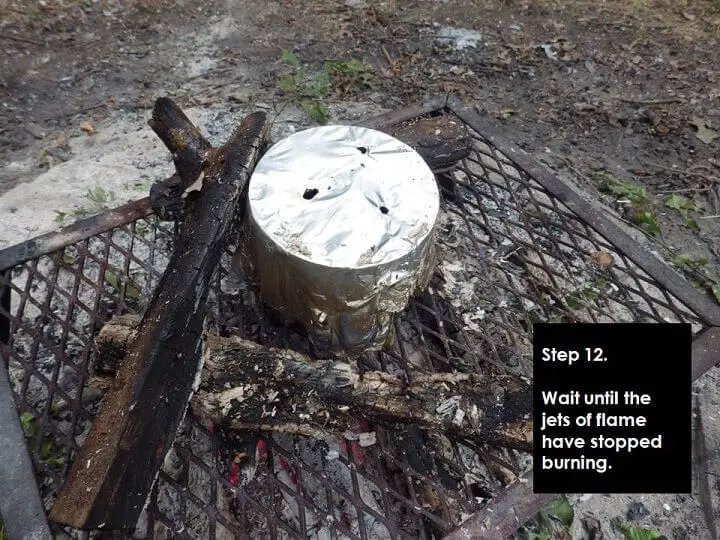
When the flame jets go out remove the can from the fire grate and place on a couple of logs to aid in cooling down the can. Continue to hold the lid down so air doesn’t enter and cause your charcoal to ignite.
Hold down the lid until the smoke subsides and then allow the can to cool for 20 to 30 minutes. You could also place a rock or log on the lid to keep air from sneaking into the can if the lid has warped from the high heat.
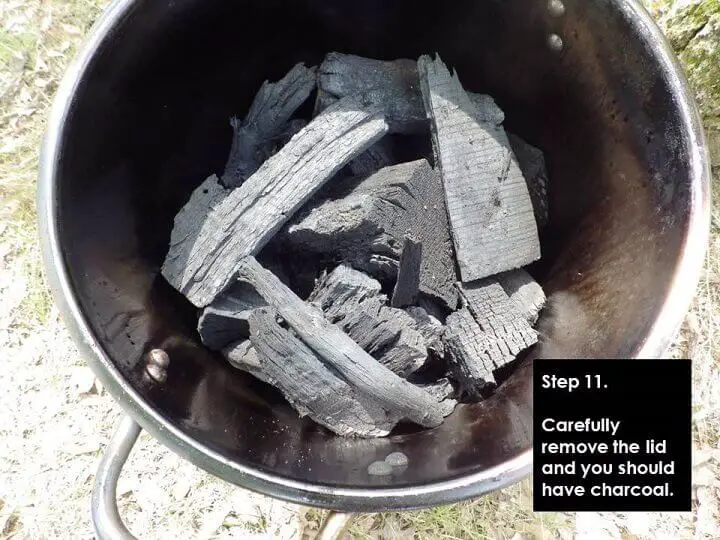
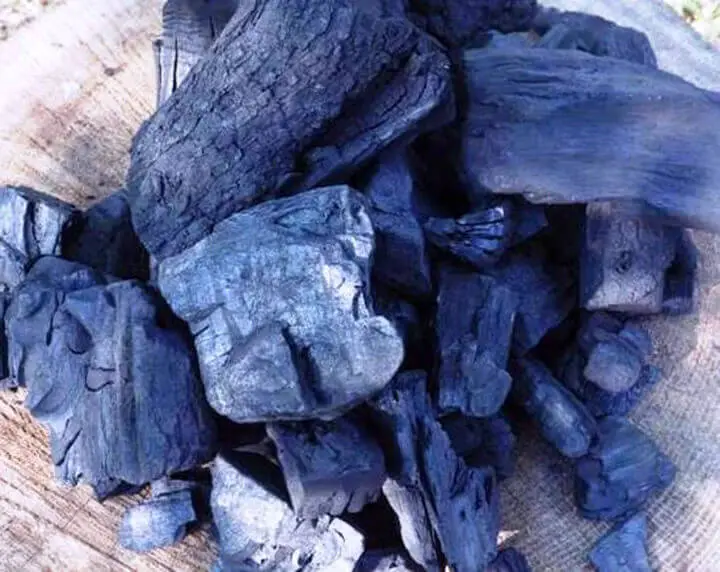
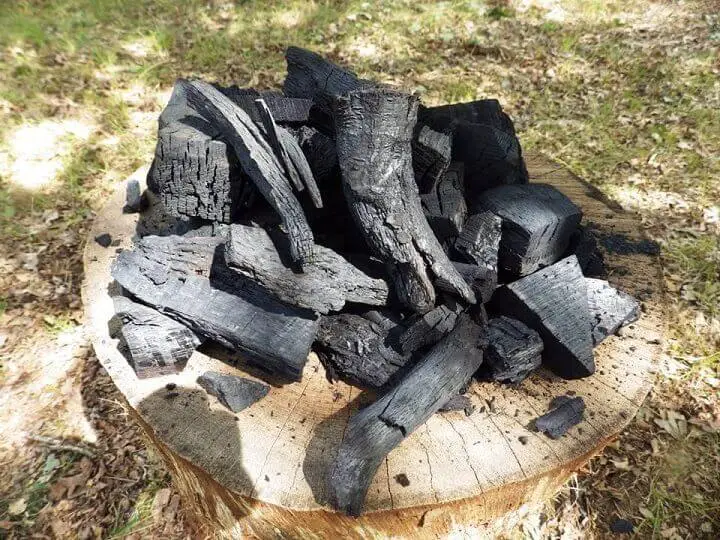
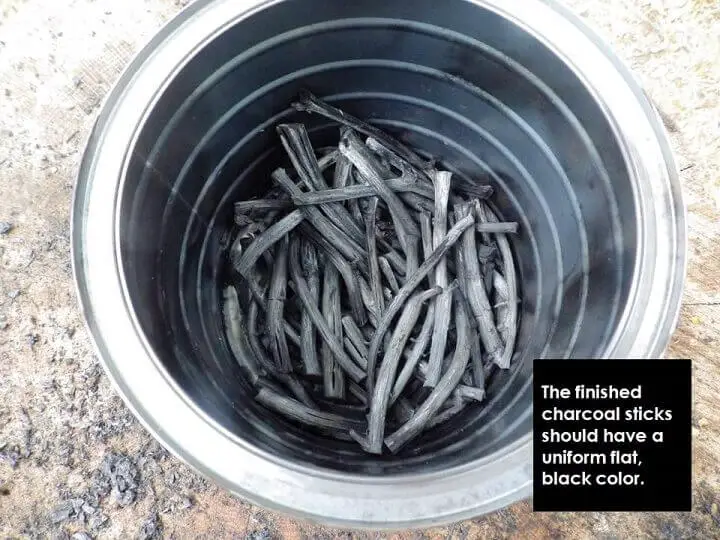
When you remove the lid you should see all pieces of wood equally carbonized to a flat, jet black color. Allow it to continue to cool and make sure no smoke starts to emerge or your charcoal could ignite and begin to burn into coals.
At some point, carefully touch and lift a chunk to see if they have cooled sufficiently. They will feel significantly lighter in your hand. On average, a chunk of wood loses 80% of its weight after carbonizing to charcoal.
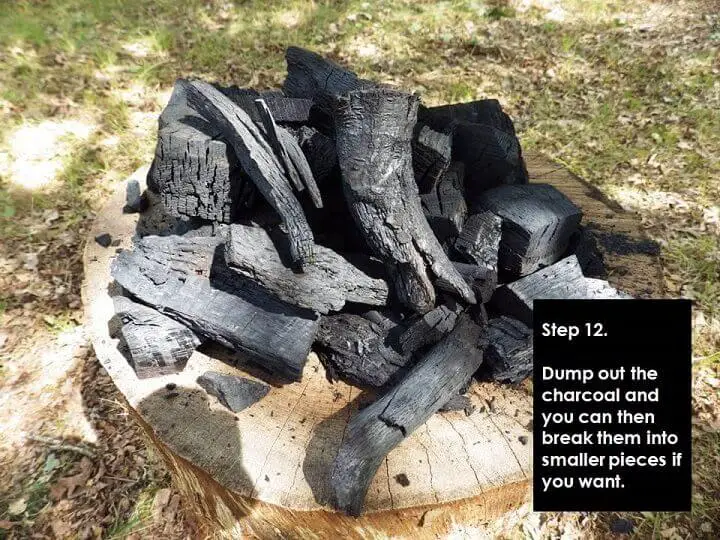
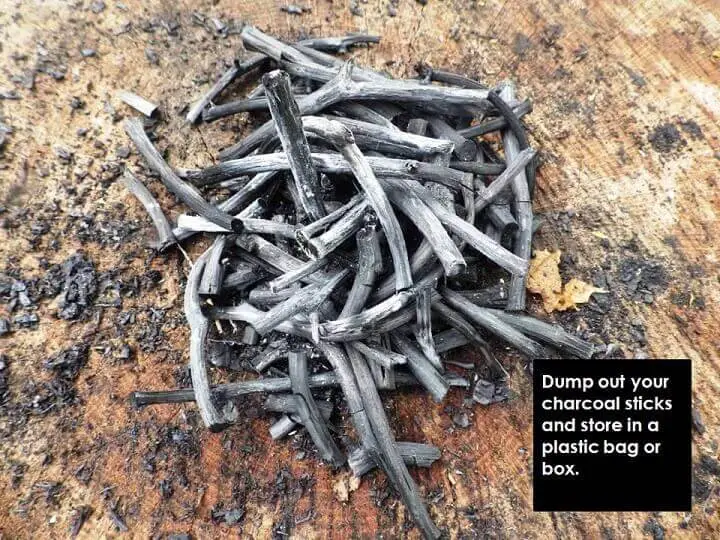
Dump out your charcoal and seal it in a bucket, can or other container. If you want you can break up the charcoal into smaller chunks either with your hands or a hammer.
2. How to Make Charcoal sticks for Artwork

35,000 years ago a primitive group created some of the first cave drawings in the south of France. The wall of the cave was their palette and their art medium of choice was charcoal.
To this day, charcoal is used as medium for artwork and if you’re so inclined you can easily make your own charcoal sticks. Kids love drawing with charcoal and professionals still use charcoals sticks to this day.
Wood Choices
The preferred source wood for charcoal sticks continues to be thin willow branches although any wood will do. Here again, hardwoods are often preferred but softwoods are used as well. Various woods actually create different effects when used for artwork so start with the wood that’s most easily available.
Wood size also varies from thin branches that can be held like a pencil to larger chunks usually about a half to one-inch thick and 2 to 3 inches long. It’s all a matter of what the artist is trying to create with thinner sticks used for detail and thicker pieces used for backgrounds and larger subjects.
The overall process is similar but on a smaller scale. Here are the steps:
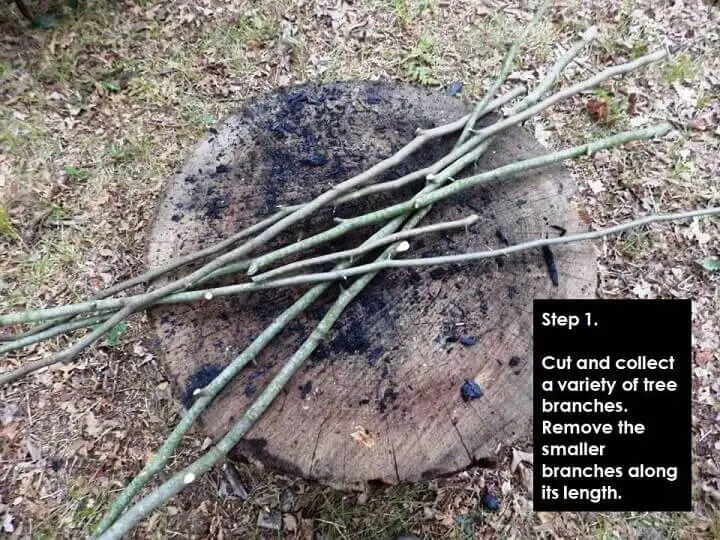
The diameter of the sticks should be no smaller than the thickness of a pencil. You can go larger but any thinner than a pencil and the charcoal stick may be too fragile. You may also want to keep all stick diameters around the same size so they all carbonize evenly.
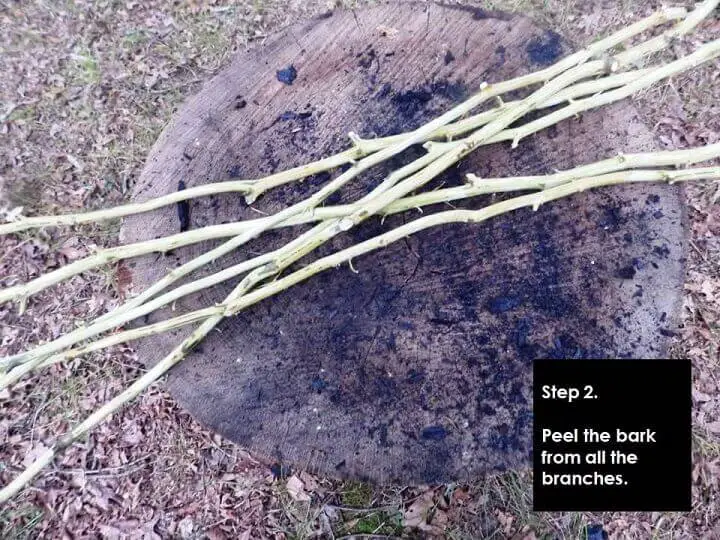
Always peel the bark or it will flake off and could interfere with carbonization of the wood.
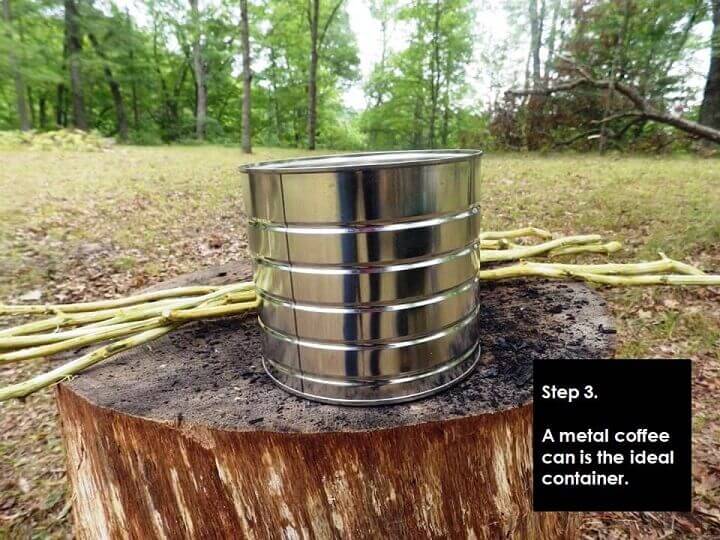
You could also use a large soup can or paint can. As long as it’s metal and you have the ability to seal the top.
You don’t want any branches higher than the top of the can. Put a stick down into the can and mark the top and cut all of the other sticks to that length.
You can pack the sticks a little tighter than we’ve shown but make sure there are at least some gaps around the sticks. When wood is packed too tightly the contact restricts the flow of heat in the container and you may have some areas that are not fully carbonized.
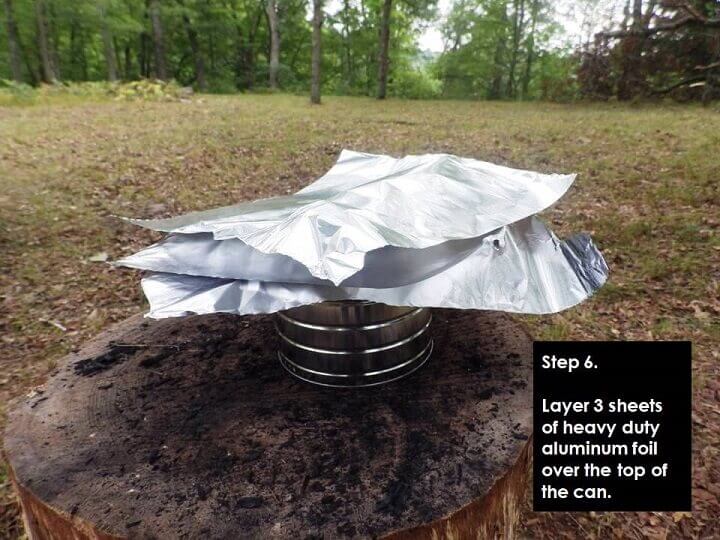
If you don’t have a lid for your can you can improvise one. Heavy duty aluminum foil is best and use at least 3 layers or more. Thinner foils will actually degrade in a very hot fire and flap around like tissue so stick with the heavy duty foil.
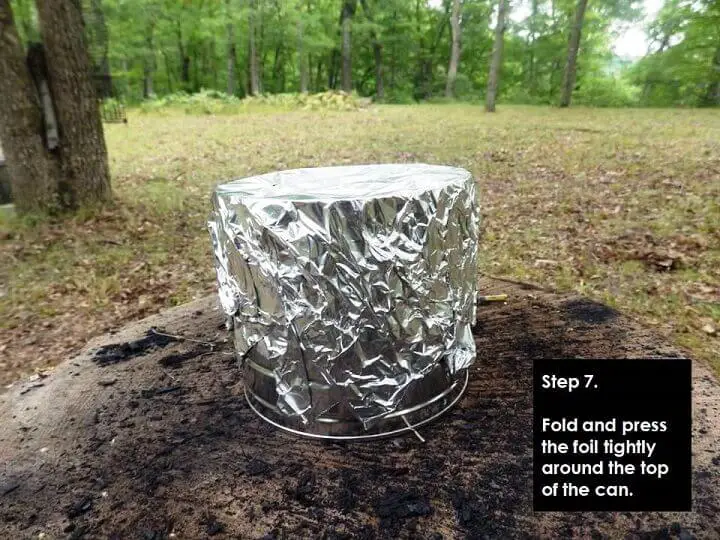
Make sure you press and seal your foil tightly around the top of the can. You don’t want any air sneaking into the can up the sides.
A pencil or sharpened stick is a great way to punch your vent holes.
This follows the same process as the lump charcoal but if your top is made from foil be careful about placing wood around the can so you don’t puncture the top of the foil.

Here again you want to maximize the heat with fire both under and around the can.
The jets of flame from the vents once again are the marker for successful carbonization. Let them continue until they flutter and flicker as the fire underneath and around burns down. The whole process takes about 30 to 45 minutes.
When the jets of flame from the vents go out it’s time to get the can off the fire.

Always let the can cool off of the fire grate. For a small can this should take 15 to 20 minutes.
Carefully remove the foil and you should see sticks of charcoal with the same flat black appearance throughout.
The finished charcoal sticks will be somewhat delicate depending on their diameter and the type of wood used. Hardwoods may be stronger than softwoods. Now all you have to do is find a cave and leave a message for someone 35,000 years in the future.
3. How to Make a Charcoal Pencil
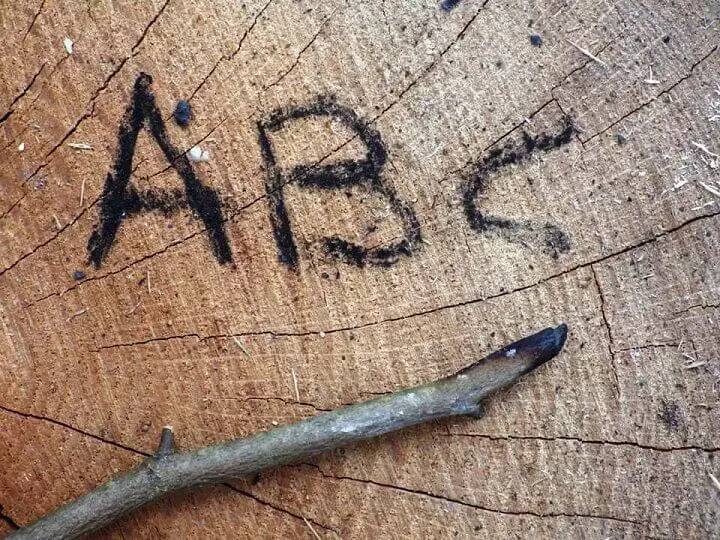
This is simple and it has a benefit. Anyone who has ever written or drawn with a piece of charcoal knows that handling charcoal leaves soot on your hands. If for any reason you want to draw or write with charcoal without the mess you can do it with this quick variation on a charcoal stick or “pencil.”
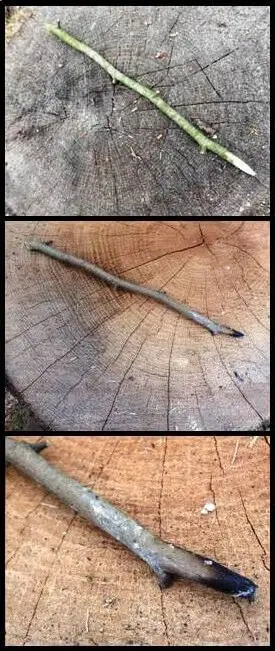
There’s no need for a lot of process steps here. Just find a small branch, cut it to about the length of a pencil, sharpen one end and put the tip in a fire, when it burns for a minute or so remove it from the fire, blow out any flame and let it cool and you’re ready to write.
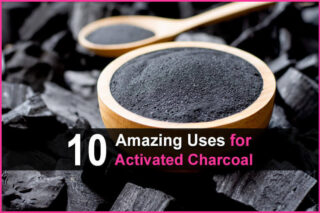
4. How to Make Activated Charcoal
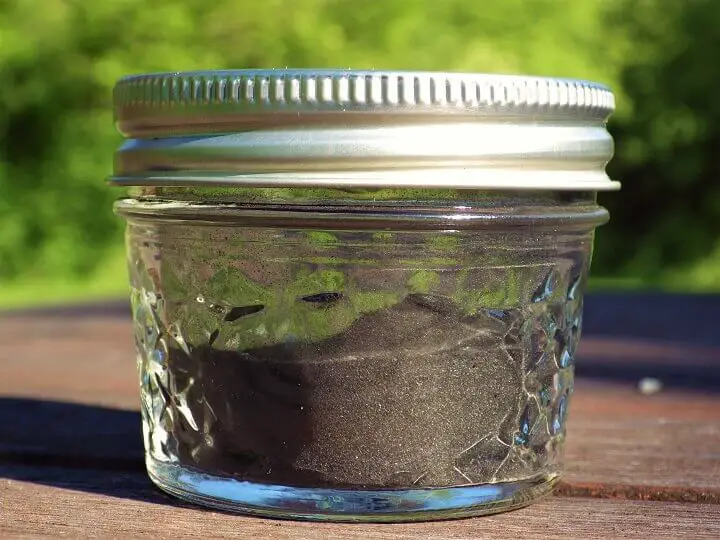
Activated charcoal has remarkable characteristics. In fact, there’s not an ambulance, doctor’s office or hospital emergency room that doesn’t have it readily available. The reason is that it’s one of the primary treatments for poisoning across a range of substances.
What makes activated charcoal so effective is its ability to absorb compounds on a massive scale. It’s essentially charcoal pulverized to a powder and treated with a high-heat process to “activate” the charcoal.
This activation increases the surface area of the charcoal’s absorption or “adsorption” rate. One teaspoon of activated charcoal has the ability to absorb poisonous compounds equal to a football field of filter material.
Water Filtration
Activated charcoal is also a prime component of water treatment and is found in water filters from portable home water filtration pitchers to camping and backpacking water filters all the way to municipal water treatment plants. Here again, it’s the ability of activated charcoal to absorb pollutants and contaminants on such a wide scale for its size and proportions.
The primary source material is the natural charcoals we’ve already discussed but there’s an additional process step beyond pulverizing charcoal to a powder. We covered all of the ways to make activated charcoal in a previous article and you can link here to How to Make Activated Charcoal.
You May Never Need to Buy Charcoal Again
If you think about it, making charcoal is fairly easy and anytime you have a fire for any reason it shouldn’t be too challenging to throw a can of wood chunks on the fire to simply make some more charcoal.
If you make it a regular activity you can constantly replenish your charcoal supply and leave the briquets behind once and for all. It’s a great way to save a little money and for those of us who grill and barbecue on a regular basis, it’s the best charcoal for cooking and a time-tested way to decorate your cave.
Like this post? Don't Forget to Pin It On Pinterest!
You May Also Like:


While this method works, it is inefficient in fuel wood use. If the bucket holding the charge has a few quarter inch holes around the bottom with none at the top, making sure the lid is fitting tightly, the released gases will be forced out there. If this is placed in a larger bucket with similar holes around the bottom for combustion air and wood piled in around the inner bucket, set alight at the bottom, the escaping gases will also ignite and add to the heat. This method is suggested by “Permies” (Wheaten Laboratories) and similar researchers.
Good point. There are even some setups that use the gases generated from the wood to ignite a constant flame so the whole operation is self-sustaining.
This in my opinion – Is one of the best written articles that I have read on the Urban Survival Site.
I do however have a couple of comments to post.
Depending upon the final usage for the charcoal there are occasions whereas softwoods such as willow will outperform charcoals made from hardwoods. I will agree – The hardwoods work better for intense long lasting heat required for grilling and blacksmithing.
Corkscrew Willow (a softwood); will help to make a faster burning black powder for firearms and fast burning black powder for pyrotechnics. The hardwoods do produce longer lasting sparks for Gerbs and rocket tails.
John – Your post reminds me of a charcoal making process known as the TLUD process, (Top Loaded Upwards Draft) which is even more efficient. Both will make more efficient usage of the wood for the heating required to make the charcoal than the method that I use. I prefer using a Retort Chamber with a top vent that can be closed at will to prevent oxygen from reaching the charcoal after it has been deemed properly cooked for the desired usage of the end product.
With the top vent; it can be easily visually determined when the charcoal is done cooking. When the burnoff is complete, the product is ready to be removed from heat, cooled and then later packaged for its intended usage. With multiple retorts available the efficiency of the fuel wood for making the charcoal can be increased.
My opinions are based upon usage for pyrotechnics, and I have an assortment of different types of charcoals for varied uses amounting to close to 250 pounds or so.
Russ
PS – making activated charcoal properly involves more effort and equipment than most people have readily available. A little activated charcoal in a medical kit for emergency usage is all that is required. Activated charcoal would not be a good choice for making black powder.
Excellent input. Thank you!