Estimated reading time: 29 minutes
It’s impossible to say when the first bricks were made, but the walls of ancient cities have been found and determined to be thousands of years old. The walls of Jericho were dated at 7,000 years old and made of brick. Bricks throughout history have been made from a variety of materials mostly determined by what was available in any given area and its ability to bind and dry into a strong, workable form.
The ancient Egyptians were known for their stonework when constructing the pyramids and the sphinx, but their bricks were used to construct mostly homes and smaller buildings, tombs, and temples. Many of those structures still stand to this day. Their standard recipe was a combination of clay and straw, but they introduced a new innovation as well: fired brick which resisted the elements over thousands of years.
Other cultures improvised bricks from other materials including things as simple as mud to other combinations as complex as Roman concrete made from volcanic ash. Early homesteaders crossing the Great Plains made their homes from soil bricks across treeless prairies.
There’s even a contemporary improvisation called papercrete made from newspapers and cement (here's how to make it). It’s the urban emergency building material when natural materials in a city are few and far between.
If you’re not inclined to make your brick from natural, found materials, you can simply buy a bag of pre-mixed concrete such as Sak-crete and follow the directions on the bag and pour it into the brick mold. We’ll cover a variation made with cement but also look at brick possibilities from nothing but natural materials.
Want to save this post for later? Click Here to Pin It On Pinterest!

The Basic Brick-Making Process
Regardless of the type of brick, most follow a set process in steps:
- Collection of materials
- Combining materials
- Mixing with water
- Setting the shape of the bricks in forms or molds
- Releasing and drying the bricks
In some instances, an additional step was added which involves firing the bricks either in a kiln or large oven or in a more primitive approach, building a large and very hot fire around the stacked bricks.
This was most commonly done with brick made from water and clay while some bricks made from other materials only required a drying process.
What Are You Building?
The type of brick you choose to make has a lot to do with its final use in construction. If the bricks are going to be supporting a heavy load or frequently exposed to water or even underwater, you’ll need to use a brick with at least a 50% clay content or a good percentage of cement. Soil and papercrete bricks are for more modest builds.
Where Are You Building?
If you’re making brick from found, natural materials, you have to consider your location. Some areas are rich in clay while others are covered in sand or—in the case of mountainous regions—hard rock. Urban areas may provide few options, but that’s where papercrete emerges as a solution using newspapers and cement.
Here are the types of brick we’ll explore:
- Clay brick
- Soil bricks
- Papercrete bricks
- Concrete bricks
Any brick making project requires some basic tools including some you may have to construct.
Brick Making Tools

- Forms or molds to hold the brick material while it sets before final drying and curing.
- Shovel for gathering materials.
- Trough or wheelbarrow and hoe for mixing and combining materials.
- Water.
- Rubber gloves when handling the material.
- Goggles and a facemask. A lot of the materials are quite dusty and you don’t want them in your mouth, nose, or eyes.
- A trowel to fill and smooth the material in the form.
- A flat area covered with plastic or sprayed with a release agent.
- A blanket or large piece of fabric to cover the drying bricks so they cure properly.
- A plastic sheet suspended over the wet blanket or fabric to prevent it from drying out from evaporation.
- A kiln or sufficient firewood to fire the brick depending on the type of brick and the need for firing.
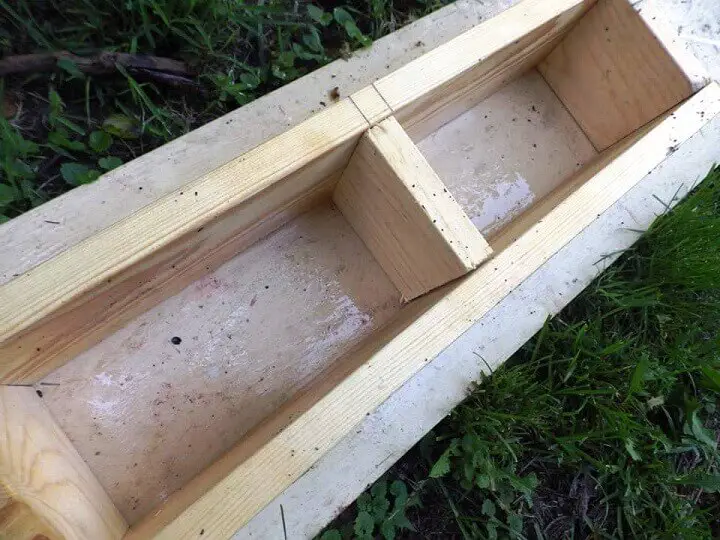
Making Brick Forms or Molds
The standard size of a brick is 3-5/8″ x 2-1/4″ x 8″. If you want to make your bricks to the common standard, that’s the size of the form you should construct.
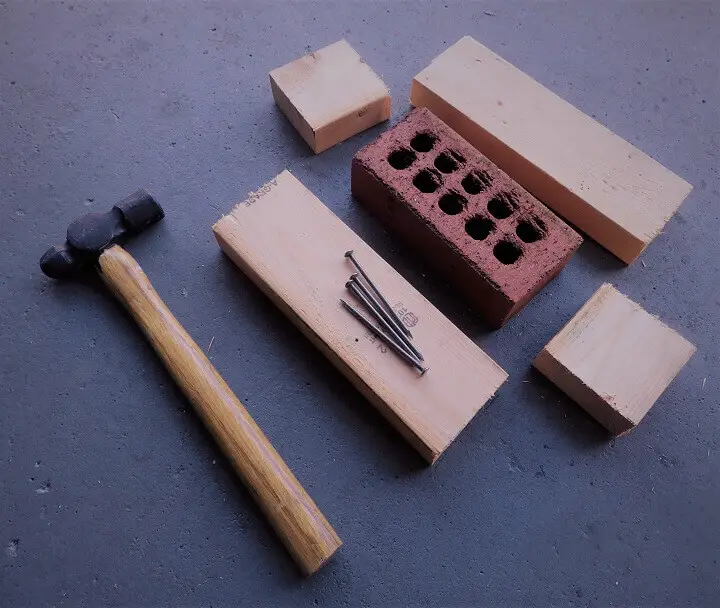
You could also use an existing brick you want to recreate and build your form around that brick to get the size right.
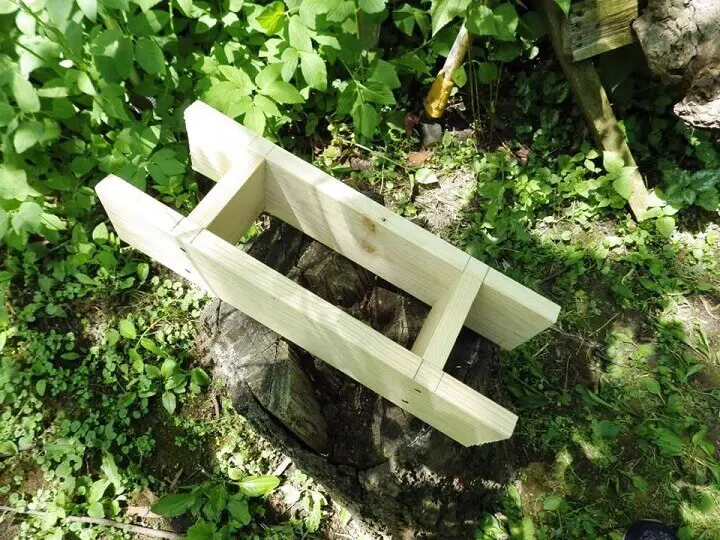
1×4’s are an easy material for making a brick form, and you can use them in any combination to create a variety of brick shapes and configurations.
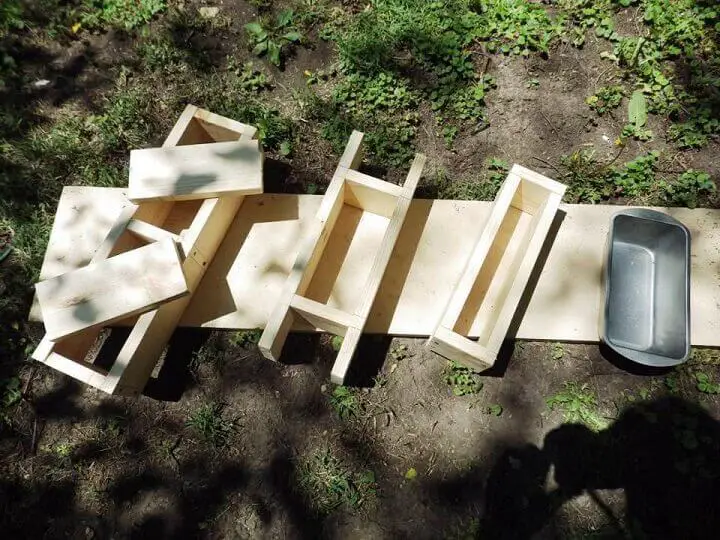
The weight of your bricks may vary depending on the materials you use but the usual weight is 4.5 pounds per brick.
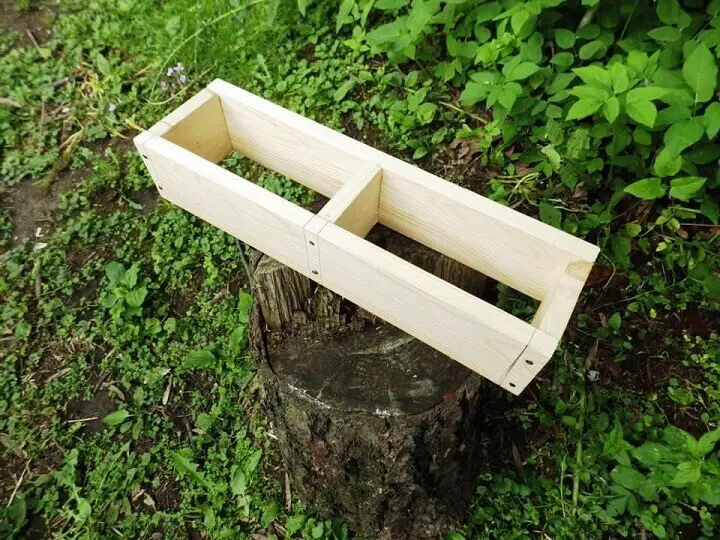
You can make forms for single bricks, double bricks or multiple bricks. If you want to make only one brick at a time, it’s easy to scale the size of the mold up or down depending on the size you want to make.
One of the benefits of making one brick at a time is that it gives you the ability to do some tests. If you’re not sure about the proportions for any type of brick, you can make one and do some stress and water tests to evaluate it and make adjustments before you go into mass production.
You can make a brick mold from anything, even a bread pan, as long as it can hold the mix or brick putty long enough for it to set up and be released from the form.
Speaking of Release…
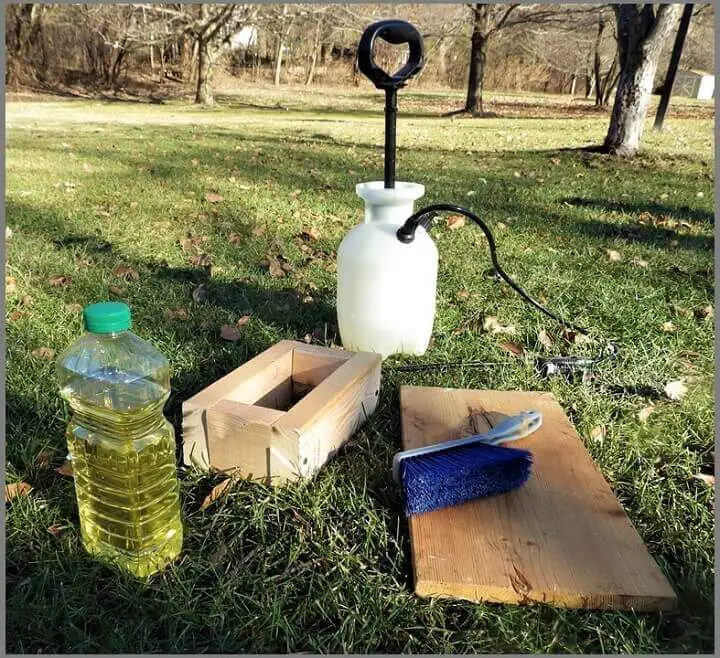
Materials for bricks can harden and dry in a mold, making it almost impossible to get it to release from the form. There are a couple of ways to solve this. One way is to spray the form with a release agent that you can buy. In a pinch, you could spray the form with vegetable oil or even coat it in animal fat. You’ll need to rinse the bricks once they dry, but at least they won’t be stuck in the mold.
Another release agent is sand. If you’re working with a firm combination of materials, you can shape it into a rough ball and roll it around in sand before pressing it into the mold.
If you have no access to any kind of release agent you’ll just have to time it right and get the bricks out of the mold when they’re firm enough to hold their shape but still wet and flexible enough to release from the mold. You could also pound the boards off the form to release the brick and then reassemble it.
Materials
The materials you’ll need will vary by the recipe, but there are 3 basic types of materials that are sometimes combined to make brick.
1. The Binder

These are materials that bind and hold the brick shape after the brick has dried. Clay is the primary binder for traditional brick making but others include pulverized limestone or volcanic rock for a primitive cement, mud made from topsoil and water, or even store-bought cement added to other found materials for the final bricks.
2. Fillers
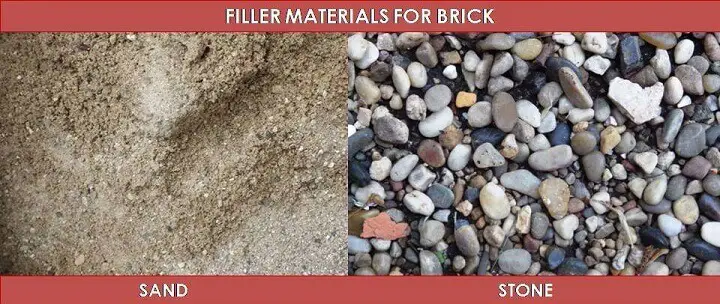
These are materials that are sometimes added to increase the amount of total material for brick making. They usually have poor binding characteristics so their proportions are critical. The more filler added to the brick, the weaker the brick when it comes to load-bearing and water resistance.
The primary filler often used in brick-making is sand or stones sometimes referred to as “aggregate.” The size of the rocks is proportional to the size of the brick although rocks the size of pebbles are typically used for a standard size brick.
3. Reinforcement
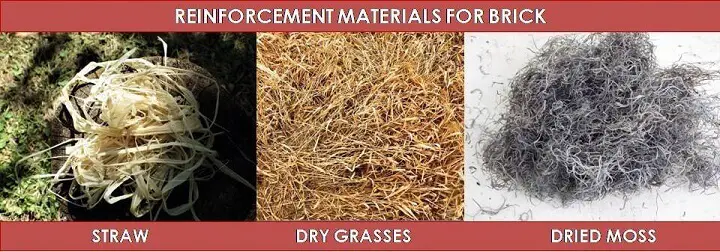
These are materials that improve the structural integrity of the finished brick. The traditional material used by the ancient Egyptians was straw. Other materials used include grasses, moss and even metal rods or nails acting as miniature rebar, and paper.
Fail Factors
Like anything else, there are some things to avoid when making brick.
Using the wrong type of brick for the wrong project.
- Papercrete is sturdy and light and can even be sawed with a handsaw. However, it will fail if immersed underwater.
- Clay bricks that have not been fired can crack under pressure and are also subject to deterioration if exposed to water over a period of time.
- Bricks made from mud or topsoil work best for vertical walls but are not recommended for any construction that departs from a vertical build and are also subject to deterioration from water if not coated with stucco or other material to protect it.
- Bricks made from concrete or fired clay brick have the most structural integrity but are very heavy and can collapse if not mortared and configured properly.
Adding too much filler or aggregate to the binder.
- Adding too much sand or stone to a binder like clay or cement can compromise the strength of a brick. The result is that it could crack under stress.
- At a minimum, at least 20% of the final mix should consist of the binder whether it’s clay, cement, or pumice which is pulverized volcanic rock.
Adding too much reinforcement to the mix.
- When materials are in short supply or physically difficult to find or gather, it’s tempting to use reinforcement materials like straw, metal or paper to “stretch the mix.” This can also lead to cracking and breaking.
- Reinforcement materials also act as fillers allowing you to stretch the binding material but here again, it’s a balancing act.
Releasing the bricks from the forms.
- Metal forms tend to release bricks better than wood but for many people, it’s a bit difficult to shape and create a metal form. Regardless of the form type you use, a release agent applied before you fill the form with material is a good idea. If your forms are constructed of wood with nails you could always pound off the wood.
Drying the bricks improperly.
- Ideally, the bricks are placed on a sheet of plastic to avoid contact with the ground which will cause the bottom to retain moisture and result in the brick drying unevenly. Plastic also releases from most bricks fairly well.
- Bricks are usually dried in the sun, but if they dry too fast they can crack. The usual solution is to suspend wet fabric over the bricks as they dry. It's best if the fabric does not come in contact with the brick surface but is suspended about 6 inches or more above.
- The fabric is then covered with plastic or a tarp to prevent the moisture in the fabric or blanket from evaporating. It can take up to three weeks for some bricks to fully dry and the fabric should be moistened from time to time to keep the dry area humid and better manage the drying process.
- Another reason to cover the bricks with plastic is to protect drying bricks from rain.
- Bricks with a concrete base usually dry or “cure” in 2 to 3 days and do not need to be fired but can also be covered with a suspended wet blanket to prevent cracking.
- Don’t forget to turn your bricks halfway through the drying process. The bottoms will retain moisture as gravity causes any water molecules to drain down and should be turned up to expose them to the air.
Firing bricks with insufficient heat.
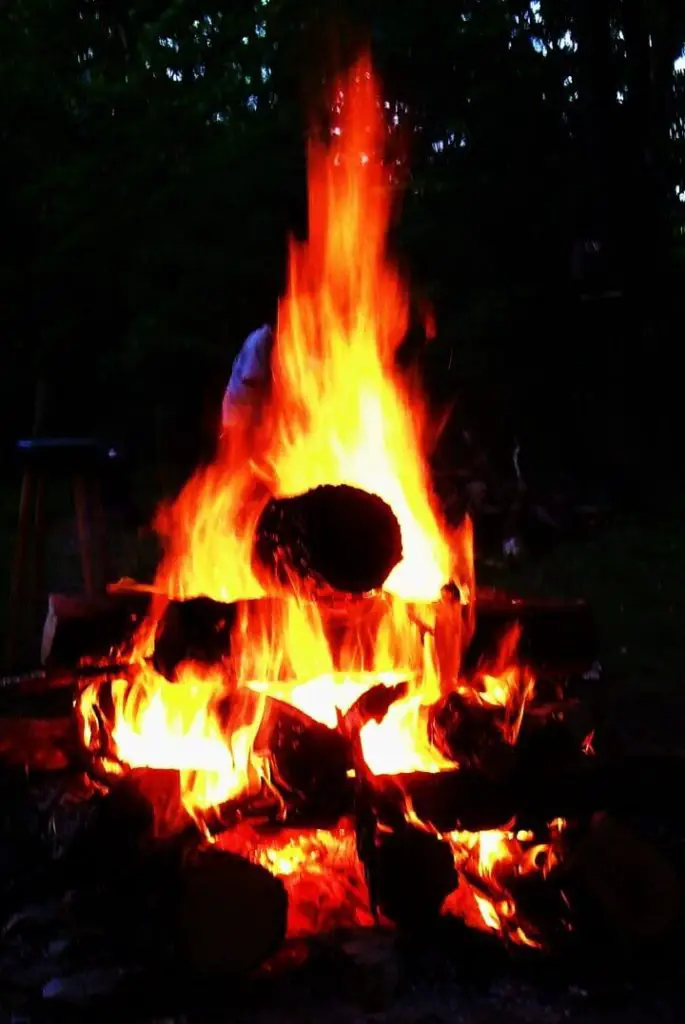
- Firing bricks takes time. A kiln is the best solution, but it’s a complex thing to build and requires a dedicated space with a permanent location. Most people use the primitive method of building a large fire over and under the bricks to fire them. That’s fine but this isn’t about a casual, evening campfire. You’ll need to sustain the fire for at least 12 hours up to 2 days and keep it hot. The longer the better.
- It’s best to stack the bricks in a circle with gaps between the bricks. Build them up like a circular chimney about 2 feet in diameter and about a foot tall. You’ll then build your fire in the middle of the circular chimney and around it. You’ll need a lot of wood.
Too much water.
- Water combines the materials and gives you the “mud” to form the bricks in the molds. You want a mix that results in a putty not a pudding-like mix you would get with a mortar mix.
- If you add too much water, add some more of your dry mix until you think you have the consistency you want. It should easily fill the mold although it helps to poke your trowel down into the “mud” to distribute it evenly and help release any air bubbles.
- You should also tap on the side of the forms with your trowel handle or a hammer to release any bubbles you missed and settle the “mud.”
1. Clay Bricks
Materials
Clay
Clay usually occurs a foot or more beneath topsoil. Dig down until you hit the clay layer and collect it in a wheelbarrow or bucket. An old landscaper’s trick is to sharpen the edge of your shovel with a file. This helps to cut and peel the clay away in slices.
Straw
You want long, dead and dry stems of grasses as reinforcement material for your clay bricks. Find some dry grass and toss it on top of your harvested clay in your wheelbarrow. You’ll want to end up with a 5 to 1 ratio of clay to straw or 5 buckets of clay to every bucket of tamped and compressed straw.
Many recipes call for the clay to be dried in the sun and then pulverized to a powder. This will allow you to most effectively combine the clay with the straw. If you don’t have the time or inclination to do this, you can mix the raw clay, water, and straw in a washtub or kid’s plastic swimming pool and walk on it with your feet to combine everything.
You might want to wear an old pair of gym shoes because you never know if something sharp will be in the mix.
Method
- Lay the clay out on a board in the sun and let it dry over a periods of days if not weeks. Cover or move the board if it rains.
- Crush the dry clay into a powder. You can do this with a stone on the board or crush it on the board under your boots. Wear a face mask; it’ll be a dusty job.
- Cut up the straw into pieces about 1 to 2 inches long. Scissors or shears work best.
- Add 5 parts clay powder to 1 part straw in a wheelbarrow, bucket or tub and add some water. Mix with your (gloved) hands or with a trowel or small shovel. Add water as you go. You want a firm yet pliable clay and straw mixture. Make sure the straw is evenly distributed into the clay and keep mixing and turning the way you would knead bread dough.
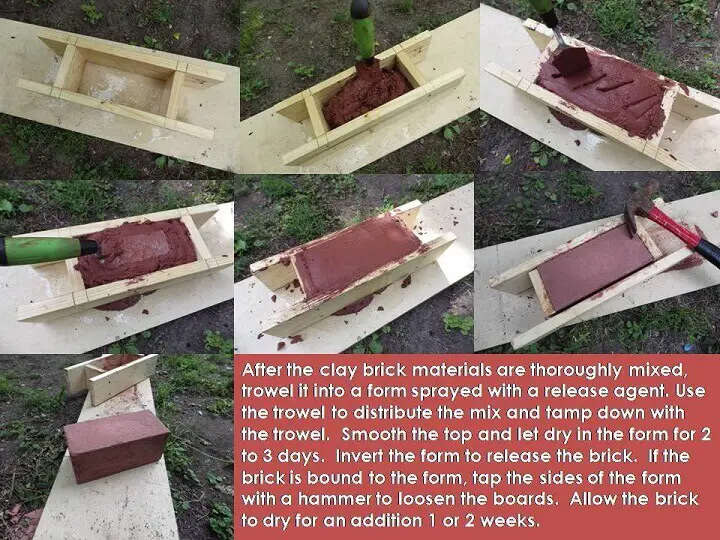
- When the mixture has a soft, putty texture, you can roll it in sand as a release agent or spray your mold.
- Press the clay/straw mixture into your mold and use a trowel to work it and press it down to fully fill the form especially in the corners.
- Smooth out the top of the brick in the form with your trowel.
- Cover the form with a wet piece of fabric supported about 6-inches or more above the clay. Cover the wet fabric with some plastic to keep the fabric from evaporating and to protect the bricks from rain.
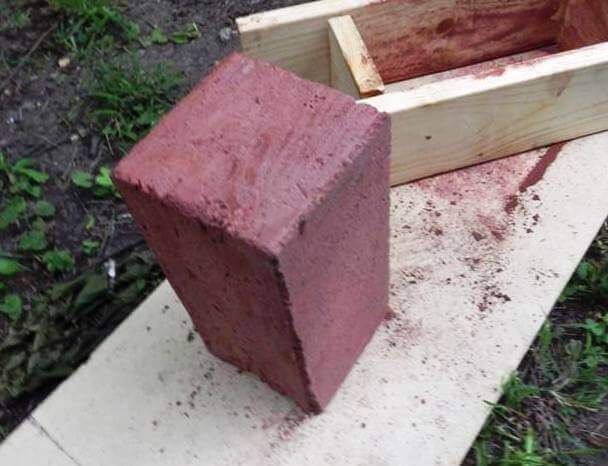
- After 2 or 3 days, invert the form and release the bricks onto a sheet of plastic on a flat surface. Cover the bricks with more plastic and let dry for another 2 weeks.
Firing the Bricks
- Build a chimney in a circle with the bricks leaving gaps between each brick.
- Start a fire in the center and then a second fire around the perimeter of the stacked bricks.
- Keep the fire going for at least 12 hours up to 2 days.
- After the fire is out, wait a day for the bricks to completely cool.
- Remove the bricks and rinse them with a hose and let them dry.
- Stack your bricks and either start your project or make some more.
2. Soil Bricks
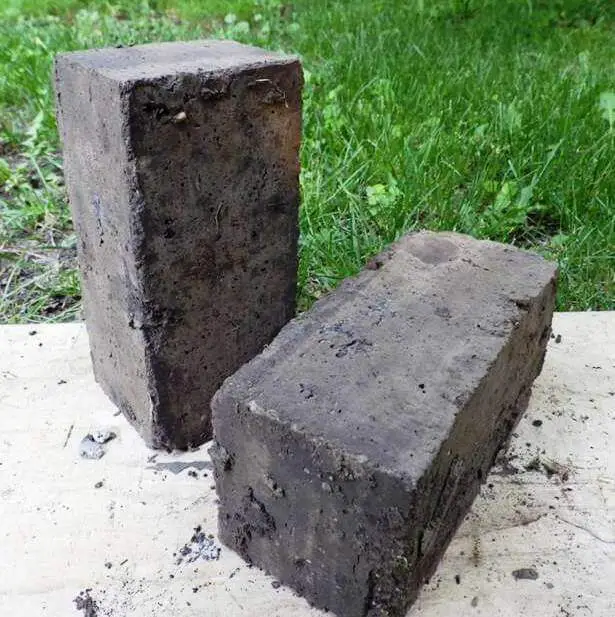
There are two ways to make soil bricks. One involves compressing the soil with a heavy rock while the other is to simply fill the form with the soil. Either way works but compressing the soil gives you a sturdier brick.
Early American homesteaders made bricks from topsoil and also compressed them by packing and tamping them down into the mold. The bricks were sturdy when used for vertical construction but were often covered with a stucco or plaster inside and outside of a structure to protect the soil from rain and snow.
Regardless of the method, there’s a certain soil composition that’s ideal for brick making. Most soils are a combination of 3 things:
- Silt or organic decomposed organic material
- Clay or microscopic mineral flakes consisting of silicates and aluminum minerals ground to a powder consistency
- Sand consisting of fine grained quartz and feldspar
Each material has different characteristics and reacts differently with water. In the case of sand, there is no reaction due to the fact that quartz and feldspar are insoluble in water.
Before you start shoveling dirt into a mold, you should measure and evaluate the proportions of silt, clay, and sand in your soil. It’s easy to do.
Determining Soil Composition
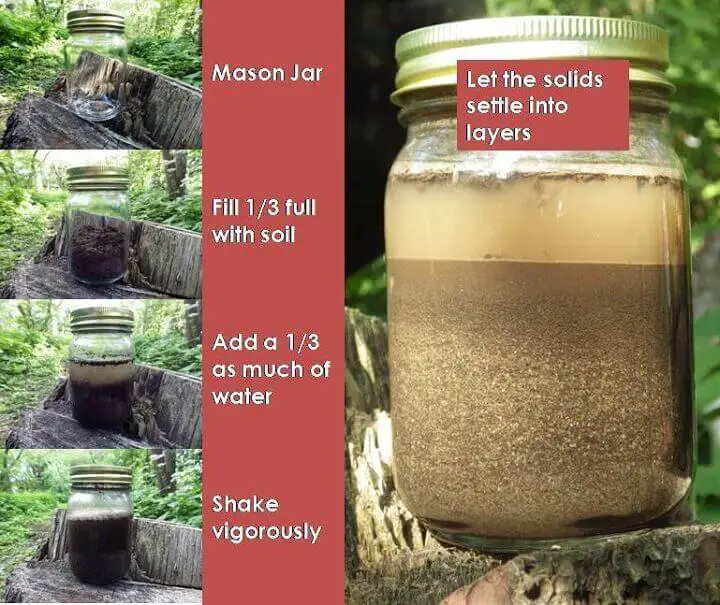
- Fill a jar 1/3 full with the soil.
- Add 1/3 as much of water.
- Shake the jar vigorously and let it sit.
- The sand, clay and silt will settle and separate into 3 layers.
- The sand will be at the bottom followed by the clay with the silt on top.
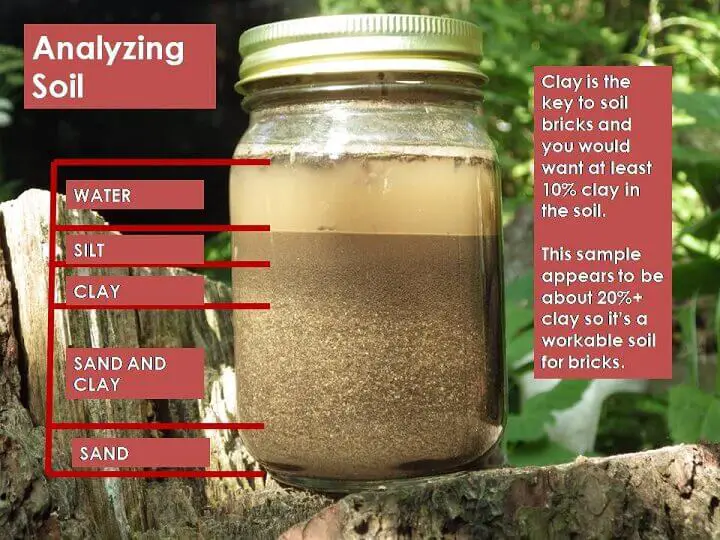
Measure the proportions of each layer to determine the amount of each. The most important ingredient is the clay and if the clay layer in the middle settles at less than a total of 20% you should either find and add more clay or use different materials to make your bricks.
Some soil brick makers say the ideal proportion is 1:1:1 or 1/3 of each of the 3 materials. Others insist on 50% clay. The only way to know is to determine the proportion you have and see if you’re satisfied with the result. It’s a balancing act. Not enough clay and the bricks will break. Too much clay and the bricks could crack. It’s another good reason to make one brick at a time in single molds until you get the recipe right.
Materials
- Dirt (the sturdiest bricks come from dirt with a clay content of 20 to 50%)
- Sand
- Straw, grass, moss or pine needles
- Water
Method
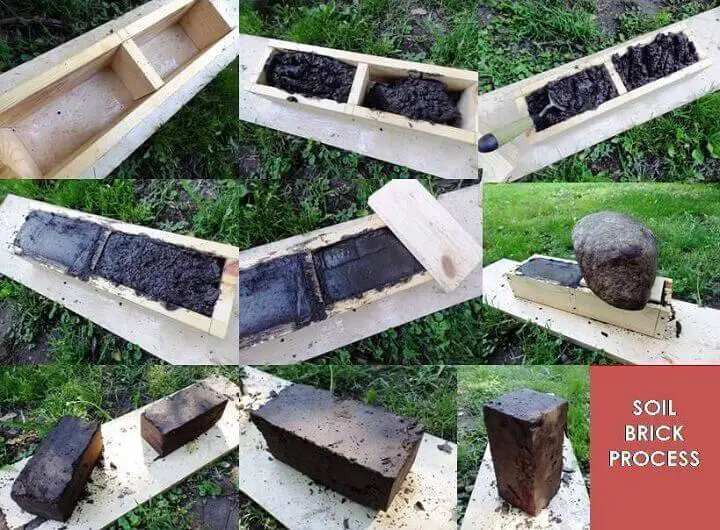
The easiest way to mix up your soil bricks is in a hole in the ground.

1. Fill the hole 2/3’s full of your brick-soil.
2. Toss some reinforcement materials on top like chopped straw or pine needles. Try to estimate a 10% proportion of reinforcement material.
3. Add water and begin to mix and turn with a shovel. Add more water as you go until you get a thick mud.
4. If you overwater and your mud is too soupy, let it rest in the hole. That’s one of the benefits of using a hole in the ground to mix. It will eventually drain away excess water.
5. Spray the forms with a release agent.
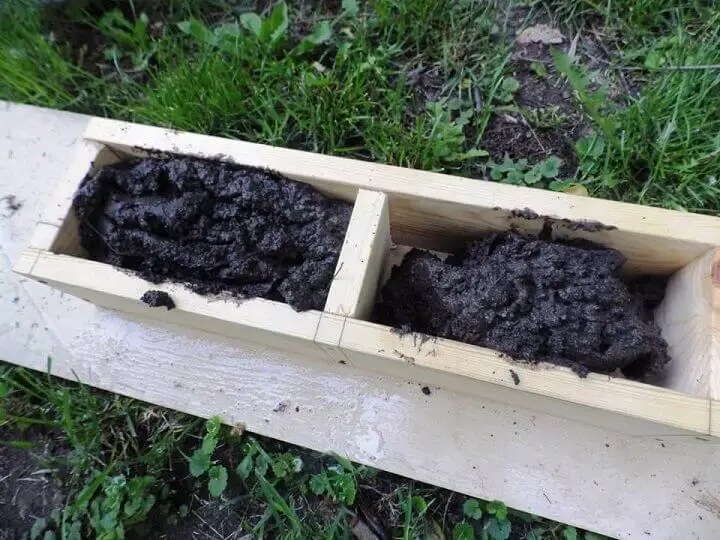
6. When you have a mud you can grab and handle, scoop it up and shovel it into the forms.
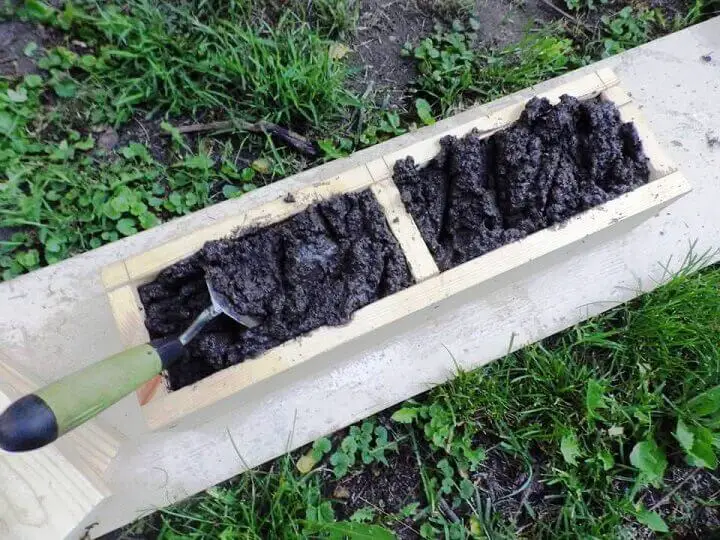
7. Push the tip of your trowel into the mixture and tap the side of the forms and smooth the top.
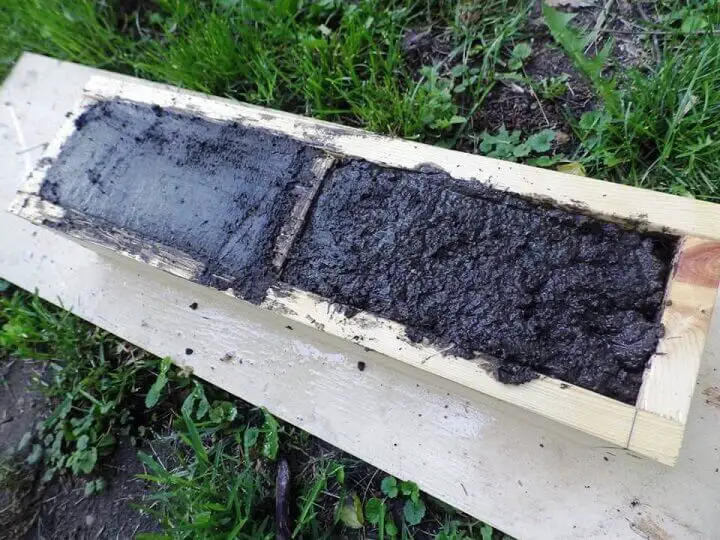
8. Use a board or trowel to finish the top.
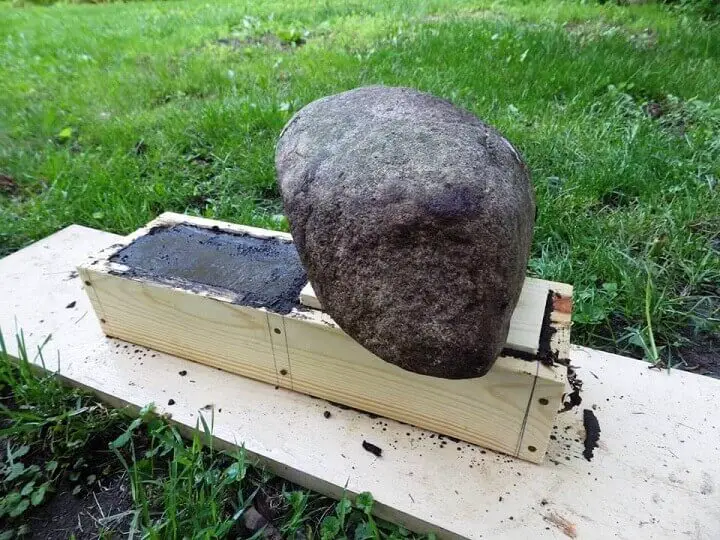
It’s at this point that some methods call for compression of the mixture. We’re going to compress one of the bricks with a board cut to fit the top of the form and a large boulder.
9. Check the forms after a day to assess drying. Keep them covered with plastic or a wet blanket.
10. Let the soil bricks dry in the mold for 3 to 5 days. They take a little longer to set up than other types of bricks.
11. Once they have set up, release them from the mold onto a plastic-lined surface and let them dry for 2 to 3 weeks. You may have to pry the molds apart to get them to release. Keep them covered and out of the rain.
If you have a high clay content of 50%, you can fire the bricks to harden them and make them more impervious to water. A lower clay content could cause them to crack and crumble in the fire. Experiment.
Tips and Tricks
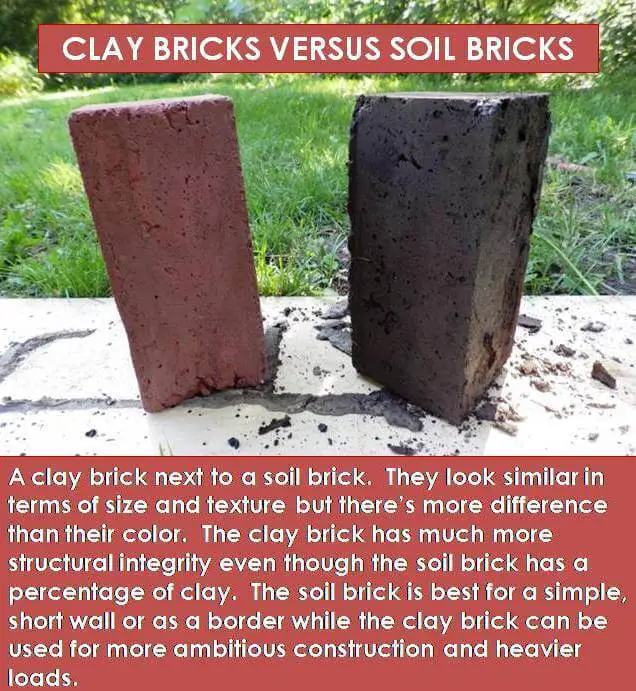
Soil bricks are great for outbuildings and structures like small storage sheds, root cellar stairs, short walls, or any other structure that is light, simple and does not require brick with strong load bearing properties. They’re also not well suited for wet environments or underwater. They can last for years but not for centuries.
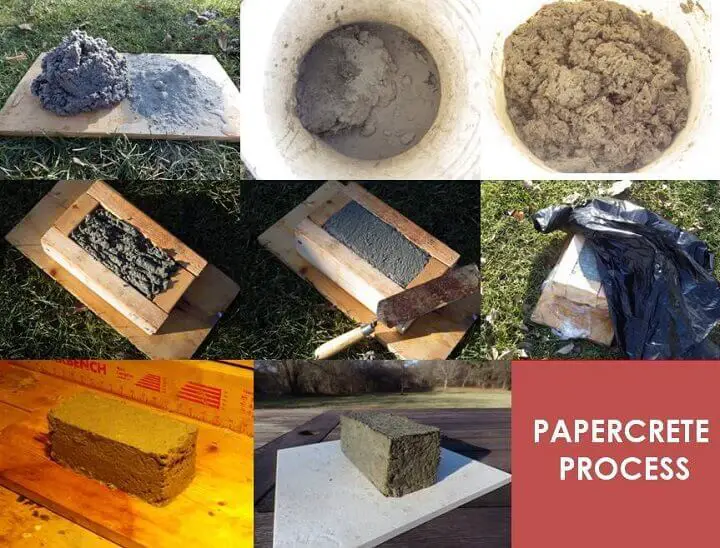
3. Papercrete Bricks
Papercrete is a combination of recycled paper and cement. There’s a process for putting them all together and they can help to stretch a limited supply of cement and create a brick that’s surprisingly light, easy to cut with a saw, and very strong.
They are not the best for any exposure to standing water or extremely wet environments. The paper will act as a wick and over periods of freezing and thawing, could cause the bricks to crack or crumble.
Materials
- Newspaper or other paper
- 1 bag of Portland Cement
Method
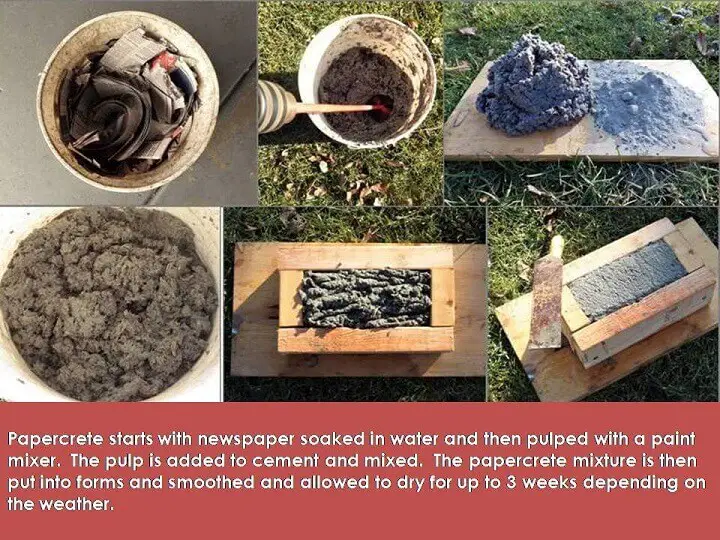
Papercrete is a simple process. First, you need to pulverize the paper with water to make a pulp. You then combine the pulp with cement in the proper proportions and put it into your molds.
Here’s the step by step directions:
Paper Pulp Directions
- Tear the paper into long, 2-inch strips and drop into a 5-gallon bucket until almost full.
- Pour enough water into the bucket to soak the paper strips.
- Tamp the paper down to compress it slightly so it is beneath the water level by at least 2 inches.
- Let the paper soak for 24 to 48 hours. You could also boil the paper in a large stockpot for 30 minutes if you’re in a hurry.
- Attach a paint or stucco mixer to the drill and move it around in the paper to shred the paper to a pulp. Experiment with drill speeds to determine which speed does the best job based on the power of your drill. You’ll want to do this out in the yard and wear old clothes. The pulp will splatter from the bucket and can splatter both you and the surrounding area.
- Continue to pulp the paper pulling up the mixer from the bottom and sides. If the mix is too dry and resists pulping, add water. If the mix is too wet, drain off some water from the top or add more paper. (You can add small proportions of dried paper if necessary but tear it into small pieces.)
- The final pulp should have the consistency of cottage cheese or lumpy oatmeal.
- Strain the pulp through a colander or for larger batches; improvise a strainer with a screen supported by chicken wire on a wood frame.
- Reserve the pulp for the final formula.
Basic Papercrete Formula
- 5 parts paper pulp
- 2 parts Portland cement
You’ll need another 5-gallon bucket for this step. If making a larger quantity, you could use a wheel barrow or concrete trough. You’ll use a trowel to mix the paper pulp and cement for smaller quantities. You could also use a shovel if mixing in a larger container.
Basic Papercrete Directions
- Add the proper proportion of paper pulp to the mixing container (we’re using 5 parts paper pulp in a 5-gallon bucket).
- Add the proper proportion of cement next (we’re using two parts cement).
- Begin blending the mixture using the trowel. If it gets too dry, add some more paper pulp. If it’s too wet, add more cement.
- When done, it should have the consistency of chunky pudding.
- It should not settle when placed on a board but hold its shape. You’re now ready to trowel into a form. If you are applying to the side of a mold for a pot or other object, you’ll want to have a thicker consistency so the wet papercrete will not slide down the mold. It’s easier in a form for a brick because the sides of the form simply contain the wet papercrete.
- After 20 minutes, the papercrete will start to settle. That’s the time to add a little more if you want a uniform shape for a brick. Use a trowel to smooth the top of the papercrete if you’re making a brick. If you’re using a mold for a pot or object, you’ll want to check the sides to make sure none of the papercrete has slid down.
- Cover the mold or form with plastic wrap for 24 hours to let the papercrete slowly cure, and then remove the plastic wrap and remove the form to allow the papercrete to stand freely for further drying.
- Let dry for another 5 to 10 days.
- If drying outdoors, cover with a loose-fitting tarp to prevent morning dew or rain from coming in contact. If making papercrete in winter, you’ll need to let it dry in a relatively warm area like a garage or a place where you have improvised some form of heat.
- Something as simple as covering it with a black tarp or a black plastic garbage bag could capture enough heat from the sun to do the job during a cold day.
Tips and Tricks
If you’re concerned about moisture with papercrete, you can paint the bricks with water-sealing paint. Prime it first and it should help to protect the papercrete from any long-term moisture damage especially freezing and thawing.
4. Concrete Bricks
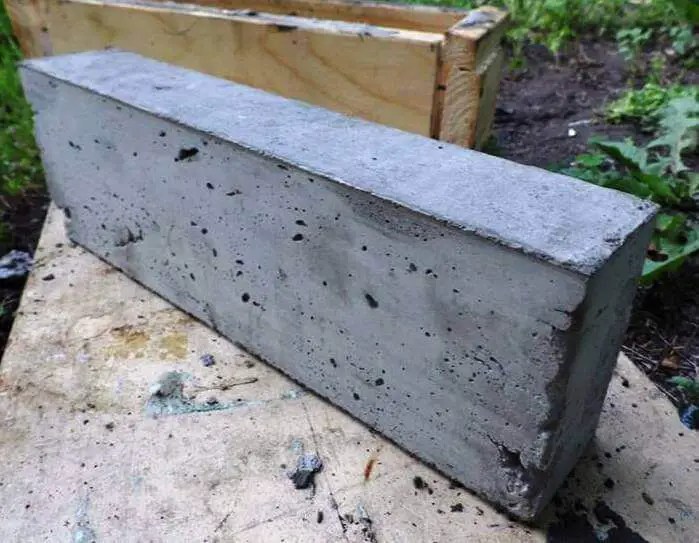
We saved the easiest for last. You still need forms and you’ll have to do some mixing and go through a drying/curing process, but the materials are easy to buy and even the natural materials you’ll add to the cement like sand or stone can be easy to find.
Concrete bricks are incredibly strong, waterproof and can bear the heaviest loads. They also dry the fastest although you should let them cure properly before using.
Materials
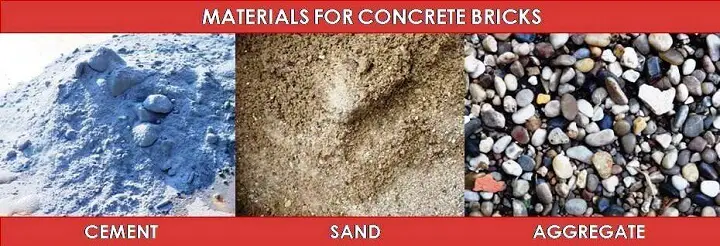
- Portland cement
- Sand
- Small stones about the size of pebbles
Method
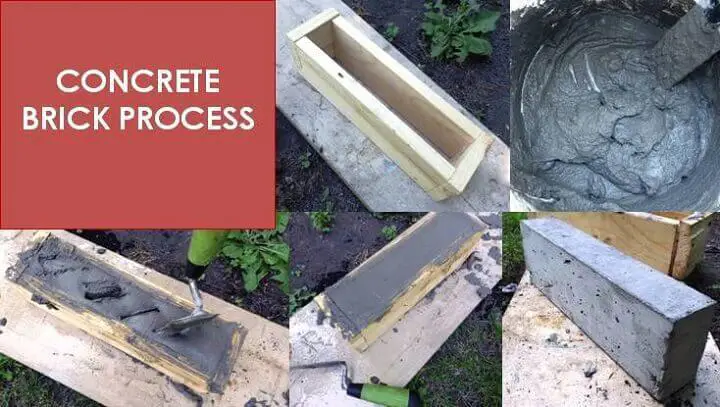
The standard recipe for concrete is 1 part cement to 2 parts sand to 4 parts stone. If you want a stronger brick for any reason, increase the concrete and reduce the stone.
You could also add metal reinforcement to the bricks. This could be as easy as pressing long nails into the concrete in the forms or any other scrap metal. Don’t overdo it and make sure any metal you add is well immersed in the concrete. Any metal should have some measurable length. Adding nuts and washers to the bricks won’t add much in the way of structural integrity.
Mix the concrete to a putty and pour into the forms. You’ll really want to make sure you spray the forms with a release agent or at least a spray of vegetable oil.
Let the bricks dry for 24 hours in the forms and then release them onto a dry surface to cure for another 24 hours.
Tips and Tricks
Concrete is the best material to use for odd shaped bricks that you want to customize. If you want an “L” shaped brick or a “T” shaped brick, just make the form to that configuration. Odd sized bricks are really helped with some metal reinforcing rods pressed into the concrete especially at any angled joints.
Mortar
You need mortar to build with bricks. The best solution is to buy a pre-mixed mortar and follow the directions on the bag. However, you can improvise your own.
The recipe is very simple.
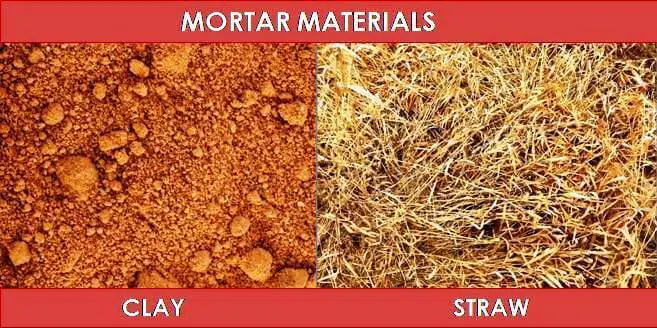
- You need a 50/50 mix of clay and straw.
- The straw should be shredded and pulverized into fibers and mixed and mixed with the clay and water.
- You want a thick pudding-like consistency that will hold up when compressed between your bricks. It should also adhere when you “butter” the side of a brick while building a wall or structure.
- Use a trowel to scoop off any excess that oozes out when you compress your bricks.
There’s a whole lot more to brick laying than slapping mortar on bricks so do some homework before you build. In a perfect world –buy a bag of mortar especially if you want a long-lasting structure.
Remember to Experiment
If you’re making bricks for the first time, it pays to make one or a few at a time until you get the right mix of ingredients and the hang of how to go through the process. Once you feel confident in your mix and your method you can go into mass production and build your own Jericho. Or maybe just a nice brick foundation for a new chicken coop.
Like this post? Don't Forget to Pin It On Pinterest!
You May Also Like: